Halloween is my favorite time of the year. I love listening to my Halloween playlist and watching spooky/scary films throughout the month of October. It’s a Holiday I’ve always enjoyed for many years.
The past few years, I have been creating my own costumes. I don’t find the logic of spending almost $100 on a costume that will only be worn once. So, my route has been to use what I have on hand and make it my own. Authentic costumes are the way to go because you can still portray your character without spending a ton of money.
The process in itself has been fun because it’s the one time of the year where I can get my creativity on and dive into the arts & crafts. In the past, I have been a Smooth Criminal, Minnie Mouse, Maleficent, The Mad Hatter, The Black Swan, Negan from The Walking Dead, A Lion/Tiger, and Little Red Robin Hood. With all of these different costumes I have created staple pieces such as hats, capes, a wired bat, fake blood, fake skin, used my own clothes from my closet and have gone crazy with the makeup.
Pixar’s “Coco” is probably one of my favorite films. I love the vibrant colors that are displayed throughout the film and it’s also a lovely story all at once. Of course, be ready to have a box of tissues because it will tug your heart strings.
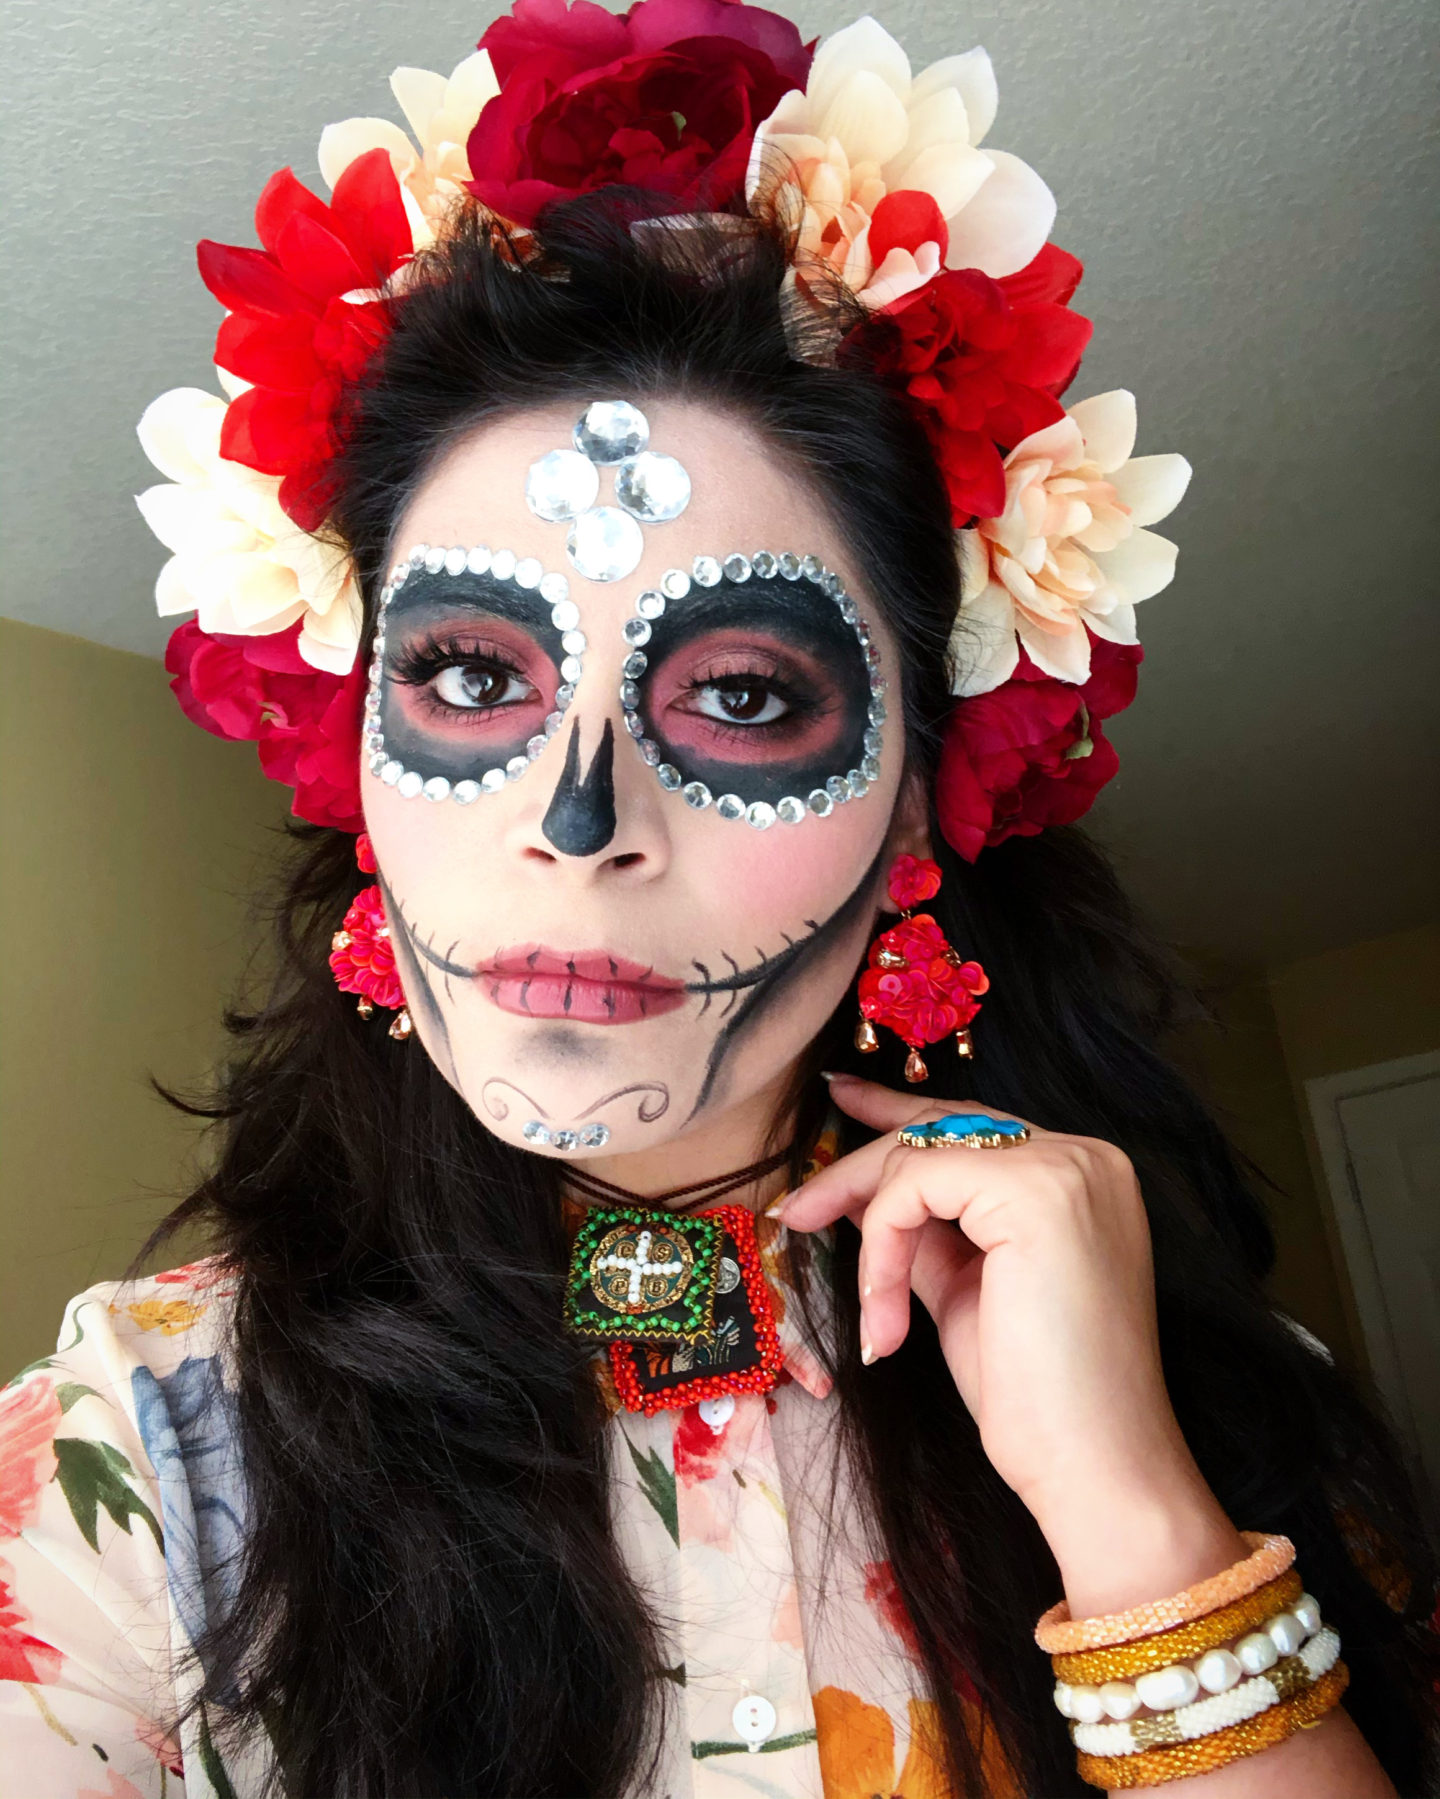
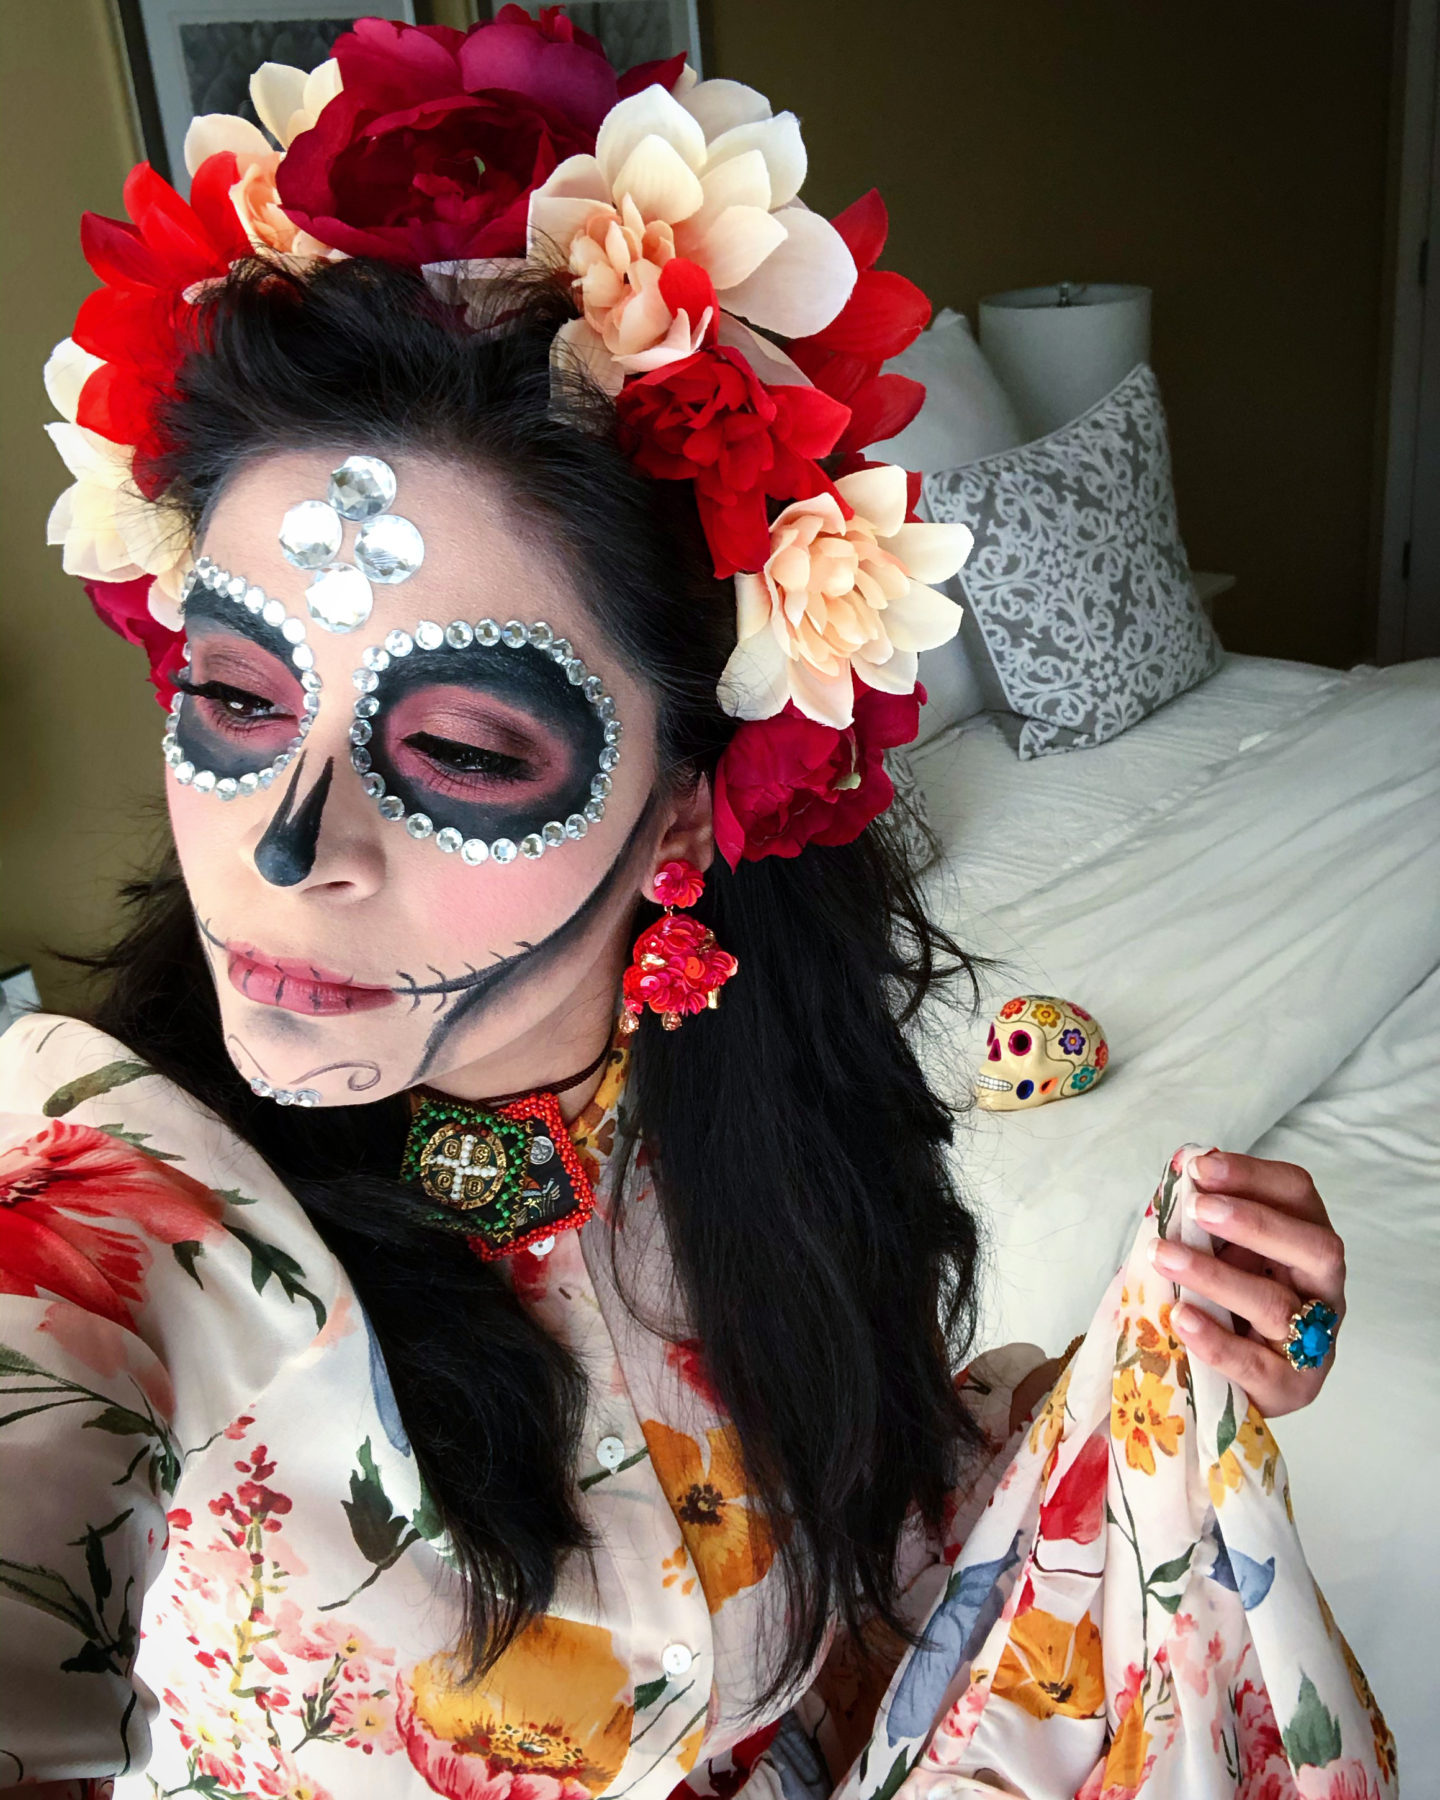
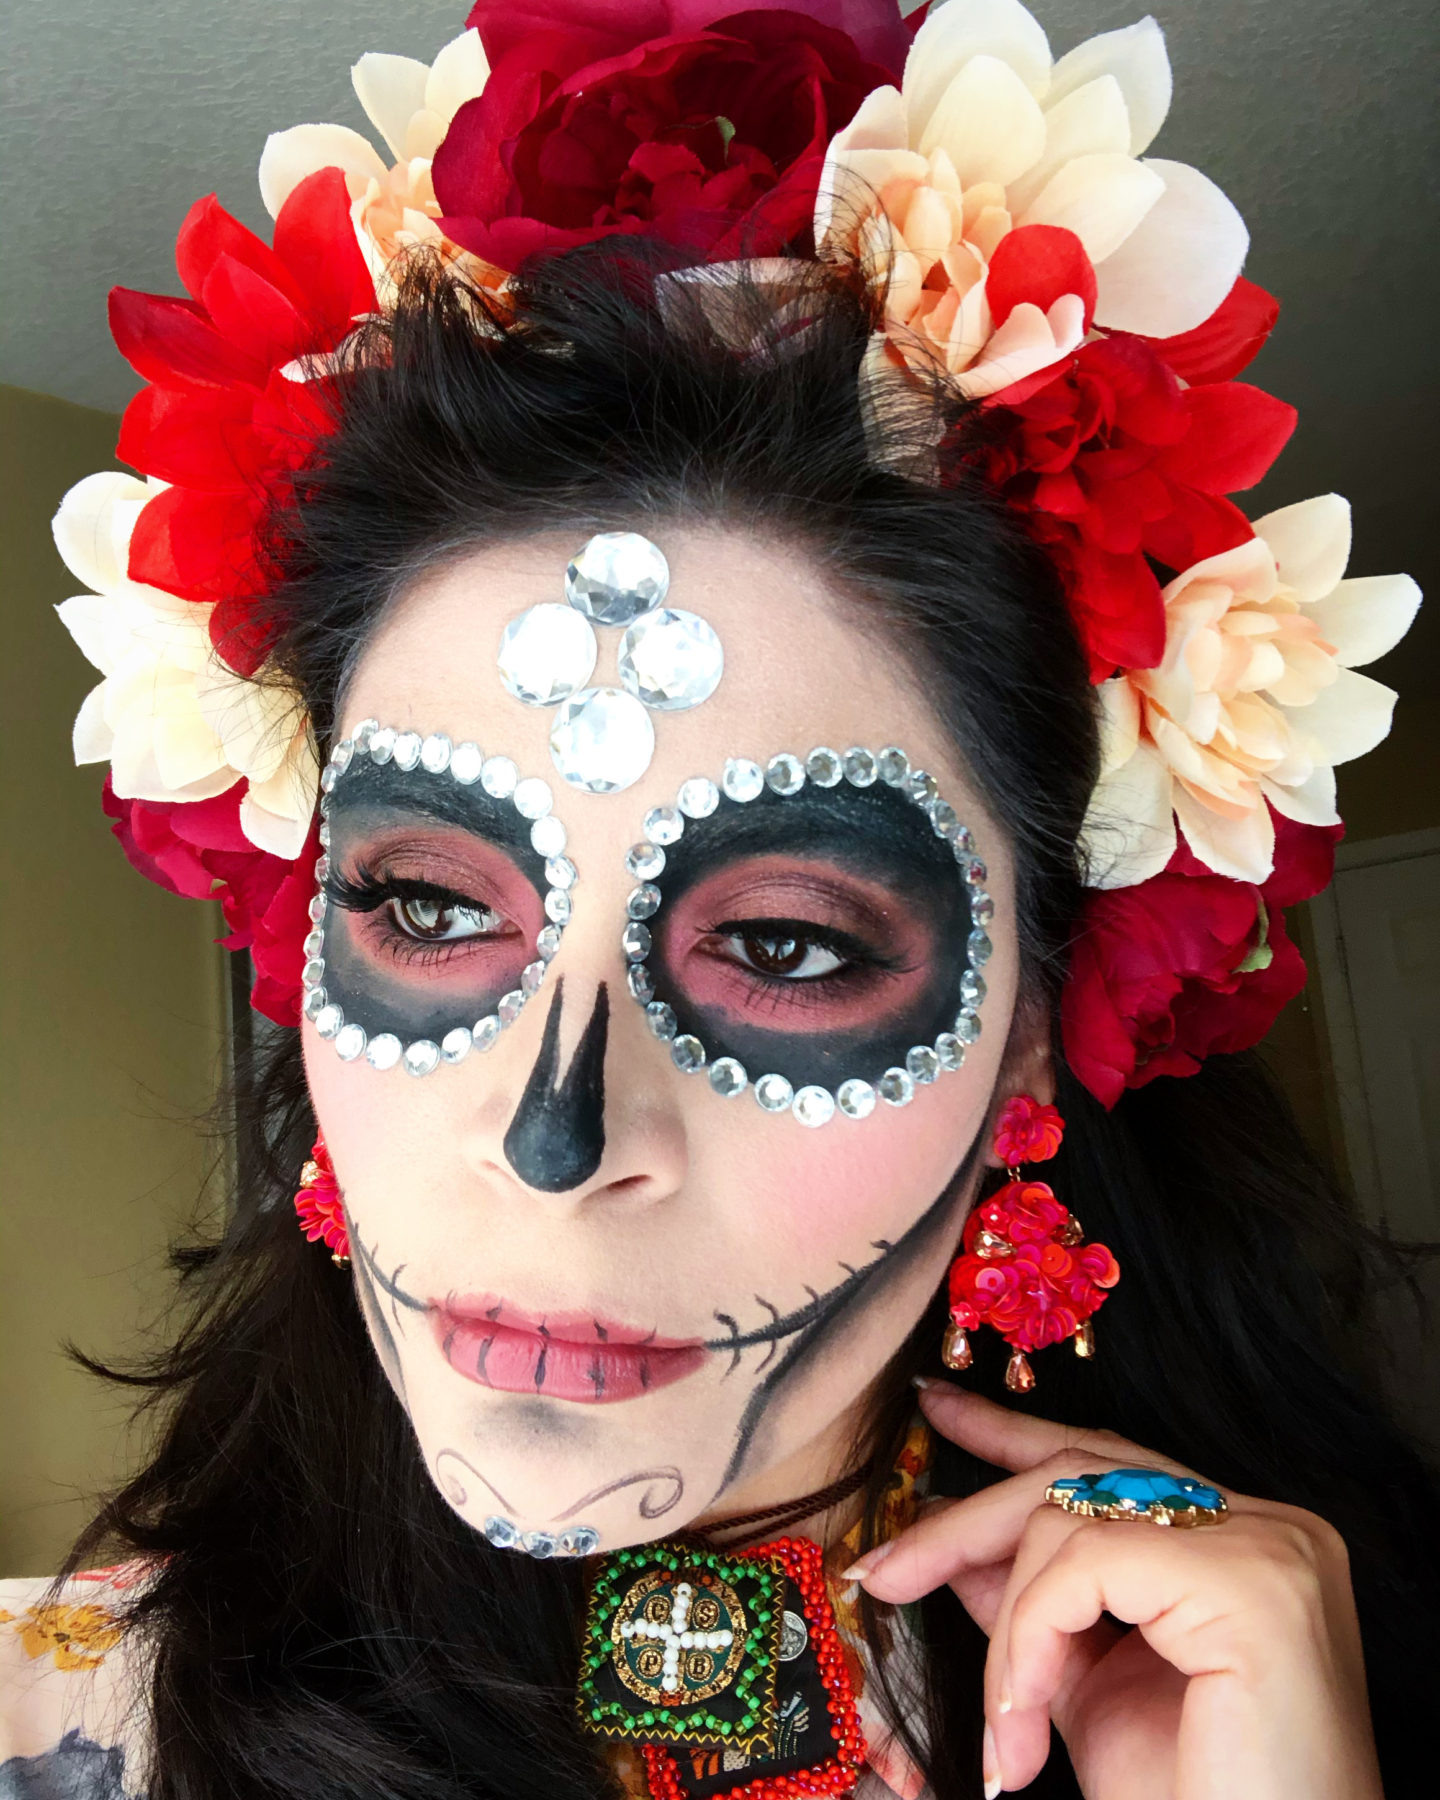
I was inspired by many factors for this costume: 1) the movie Coco, 2) the story behind La Llorona, and 3) The Day of the Dead (Dia de Los Muertos). It’s a very easy costume to put together and it’s also one that you can wear not only during Halloween, but also throughout Dia de Los Muertos which begins on October 31st and ends on November 2nd. It’s a day in Mexico where everyone can celebrate the dead and remember those who have passed.
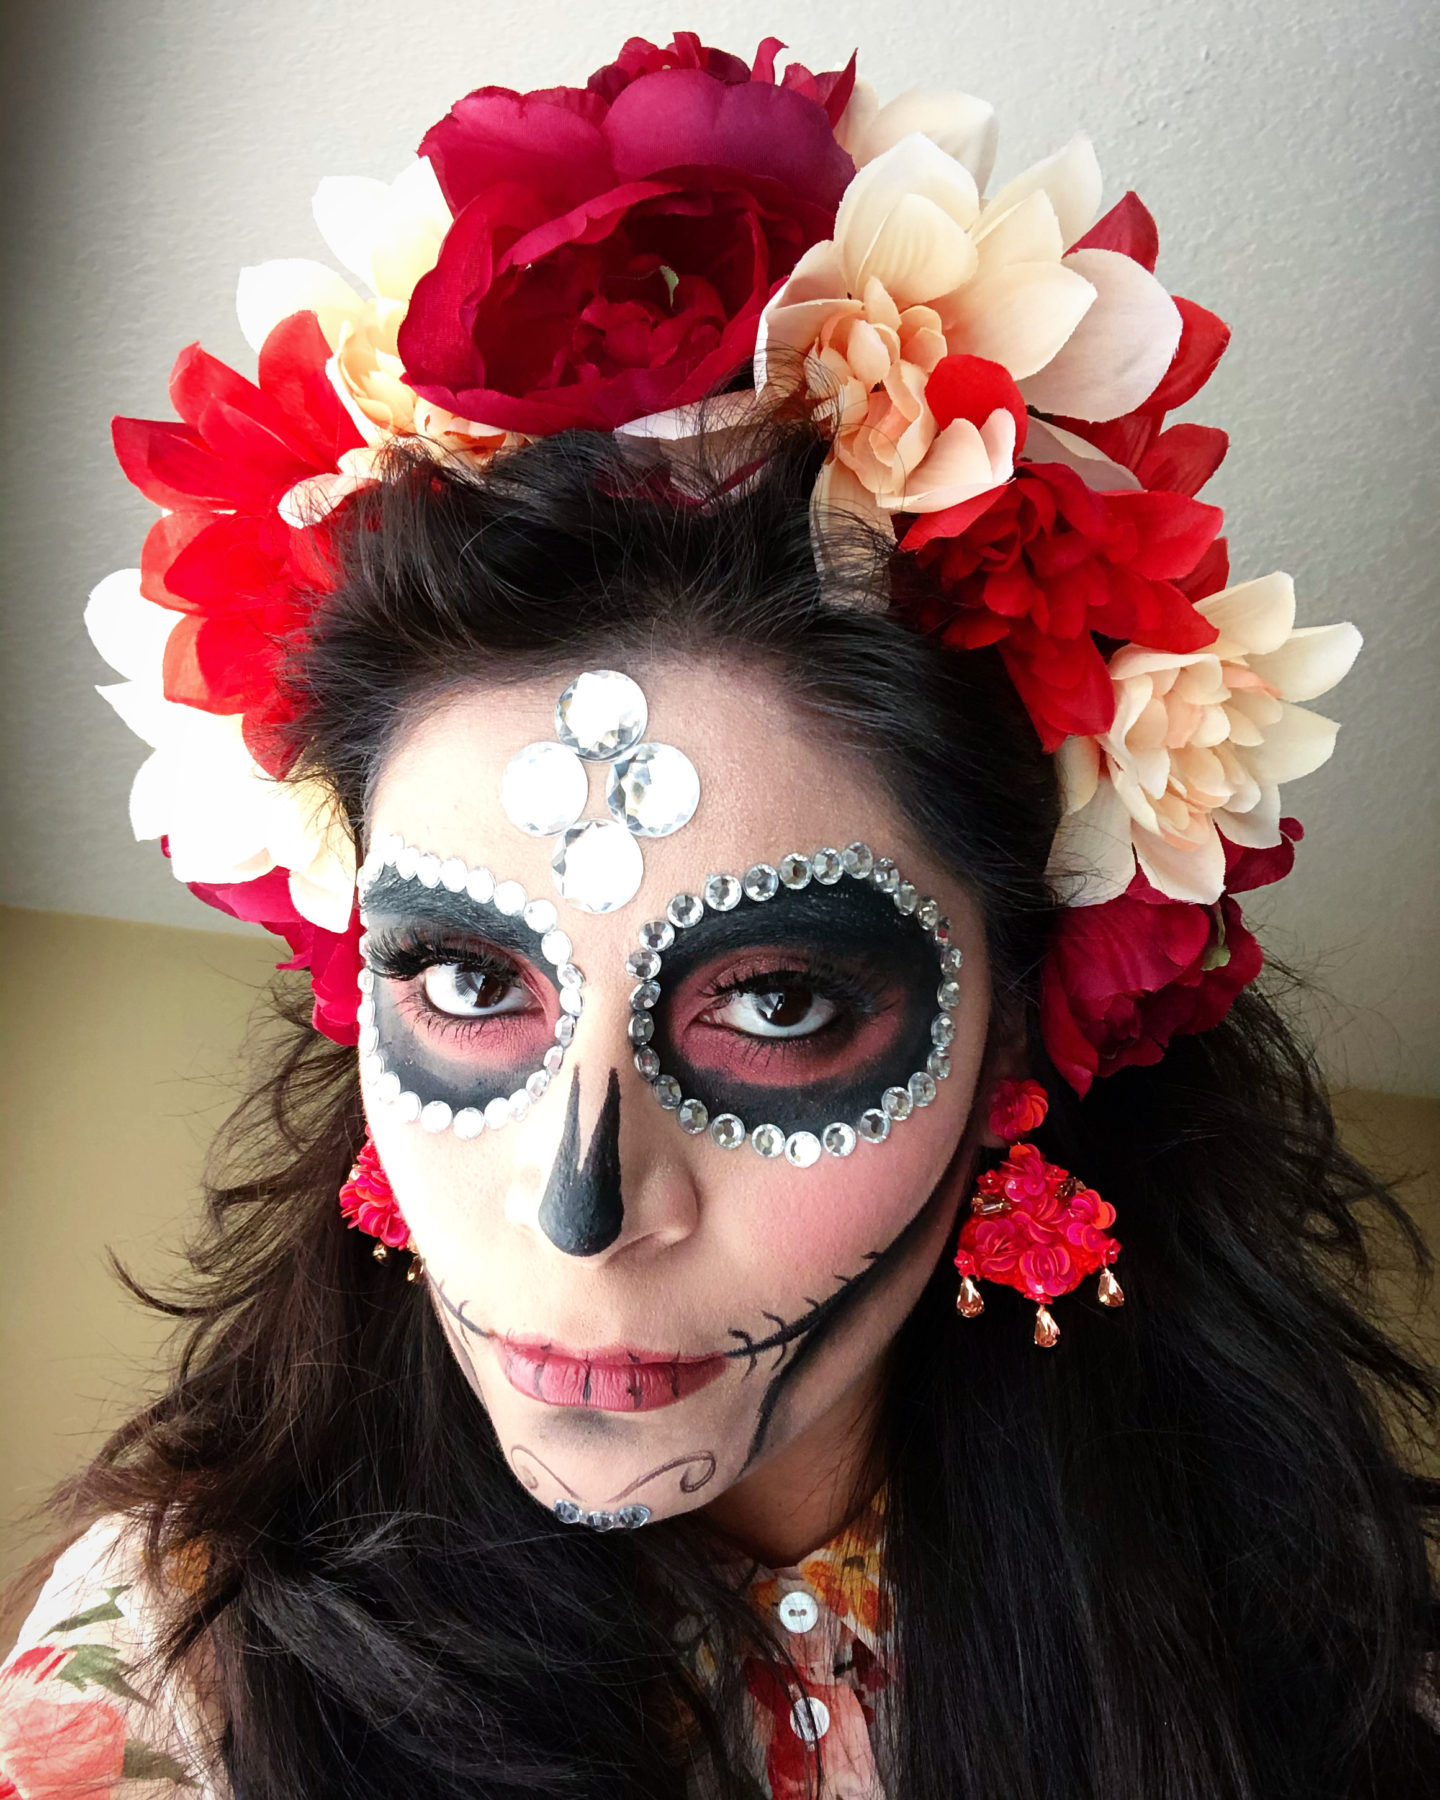
The longest piece of this entire costume that takes the longest is the makeup. It took about an hour, including adding the jewels which had to be individually glued. The floral headband only took no more than 30 minutes.
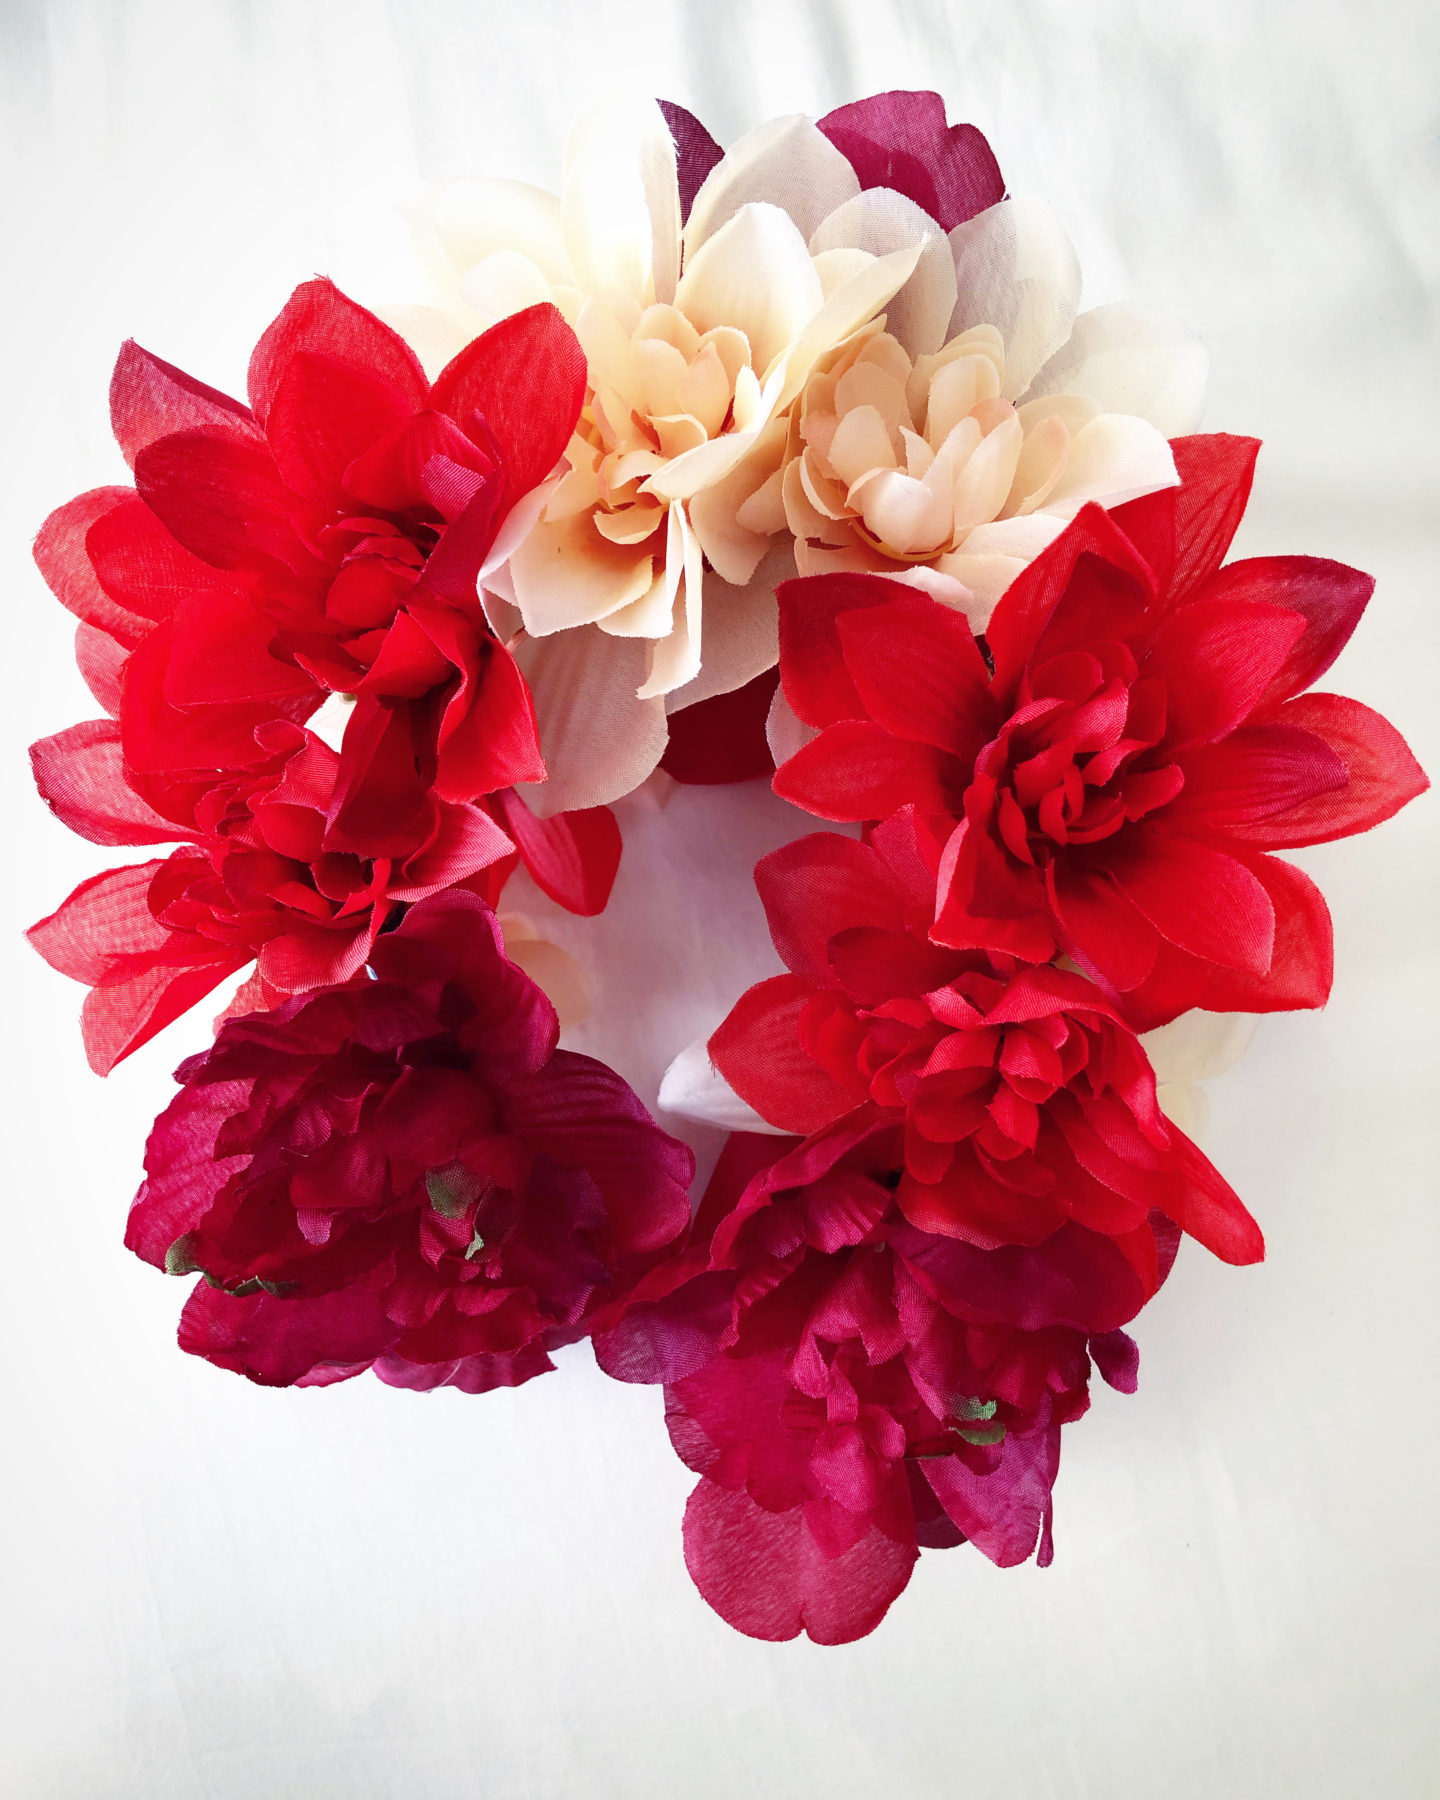
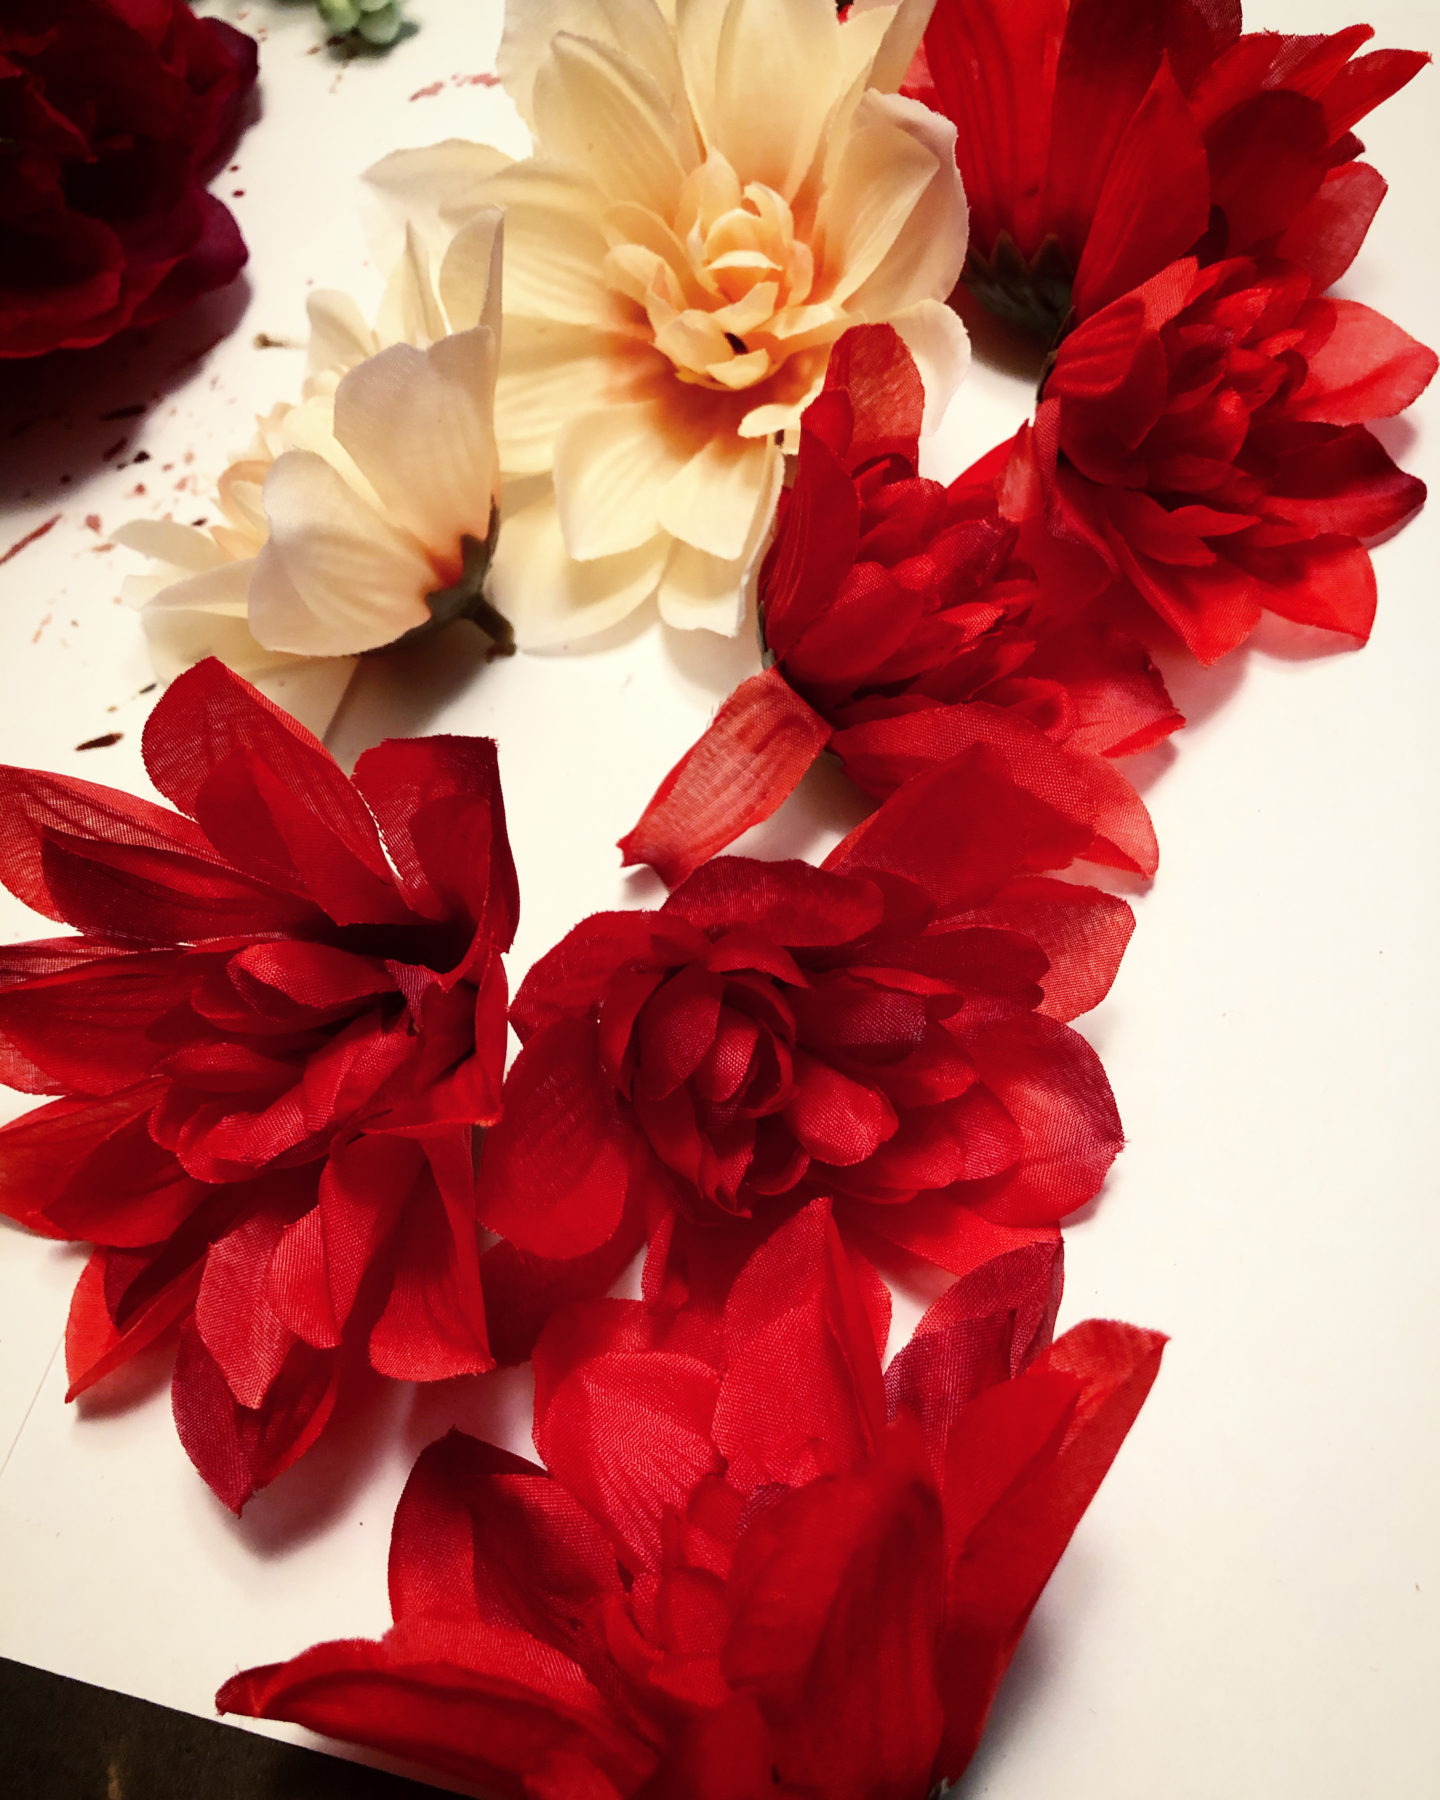
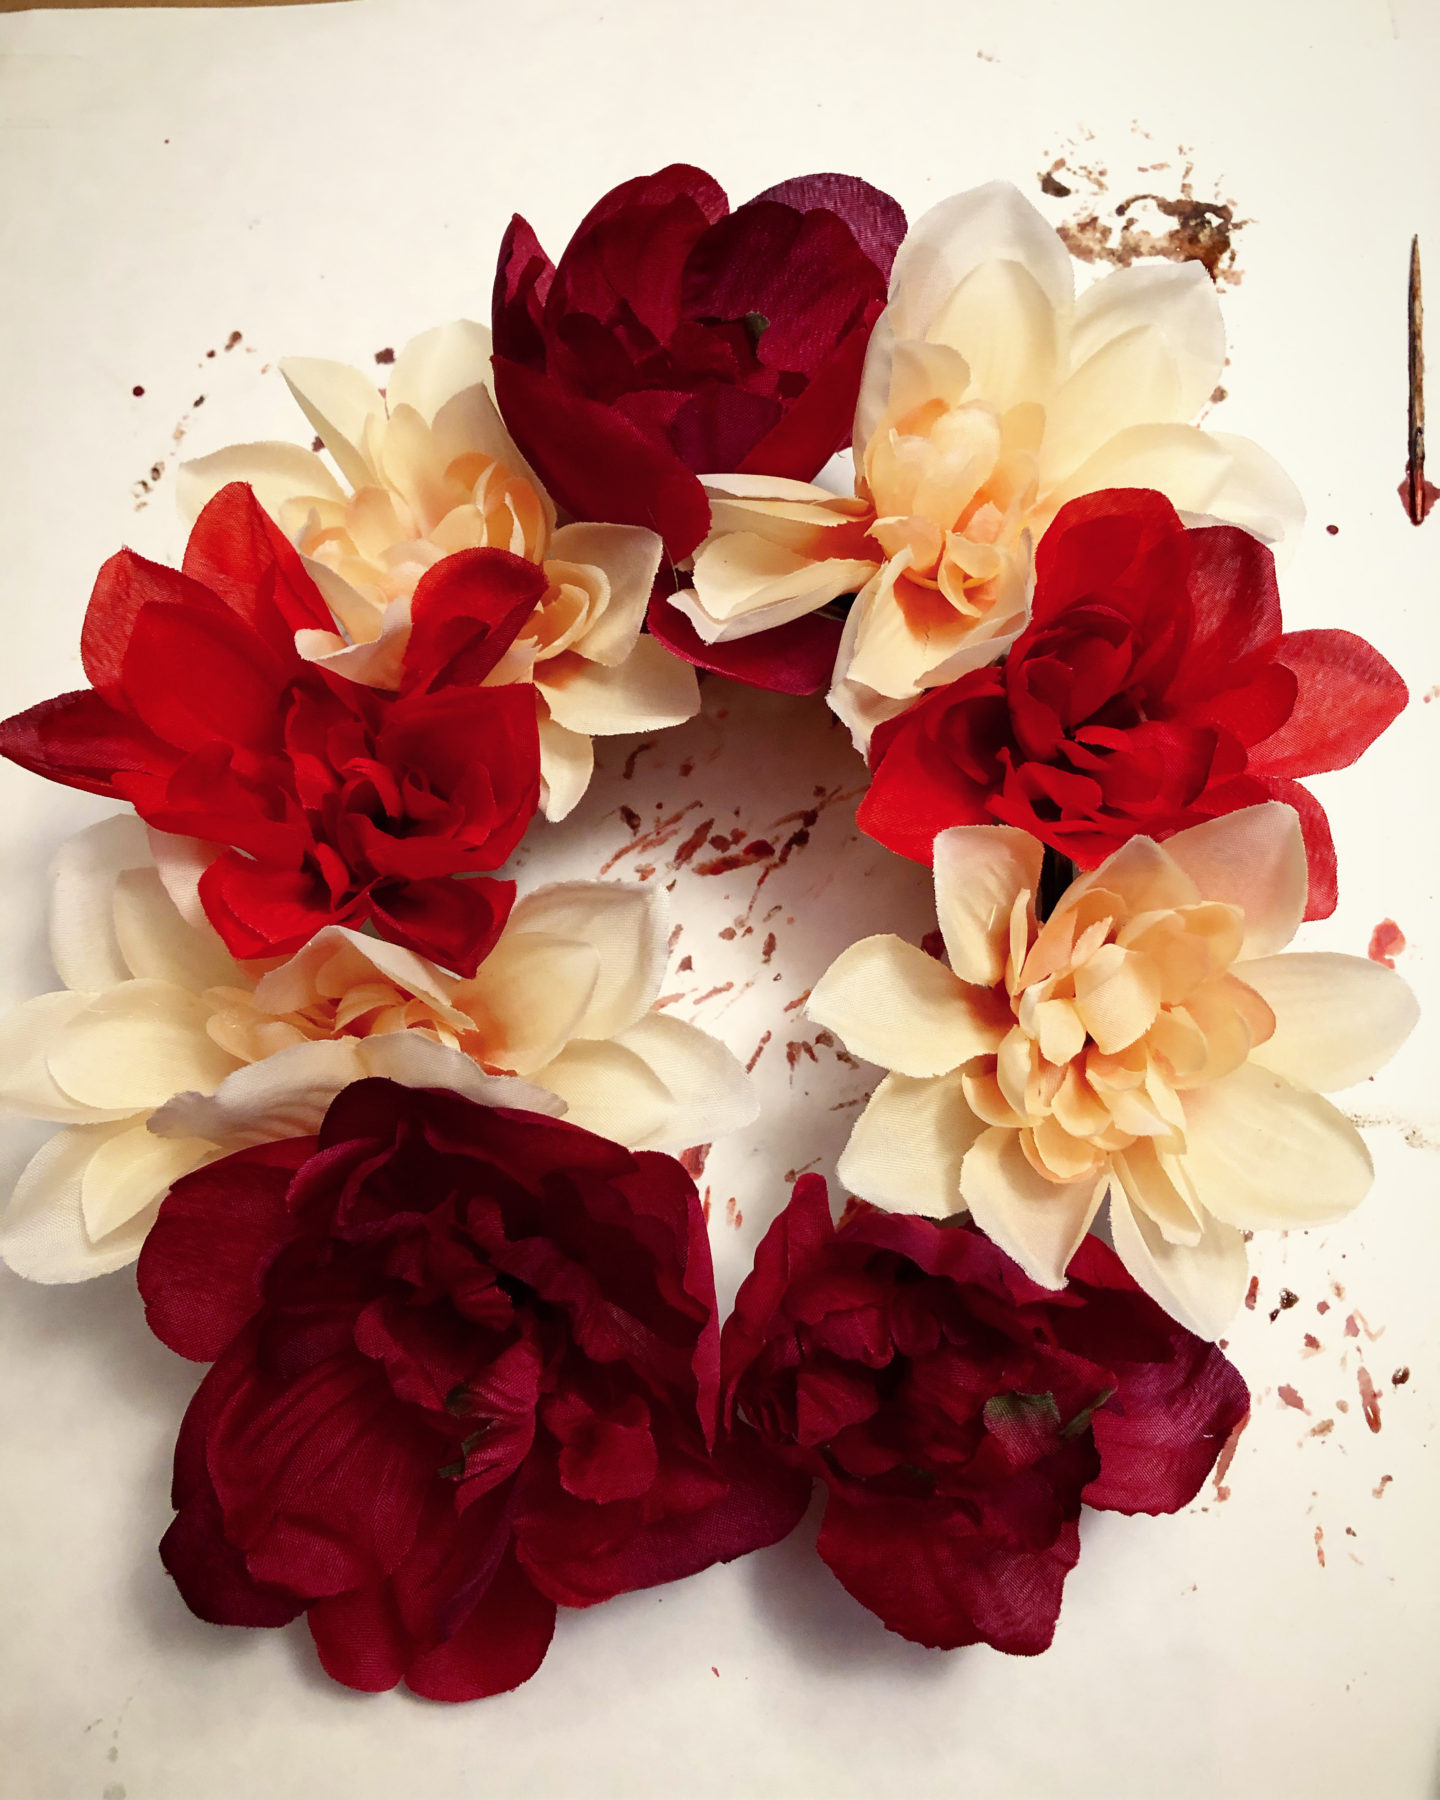
FLORAL HEADBAND
What you will need:
- Hot glue gun from JOANN
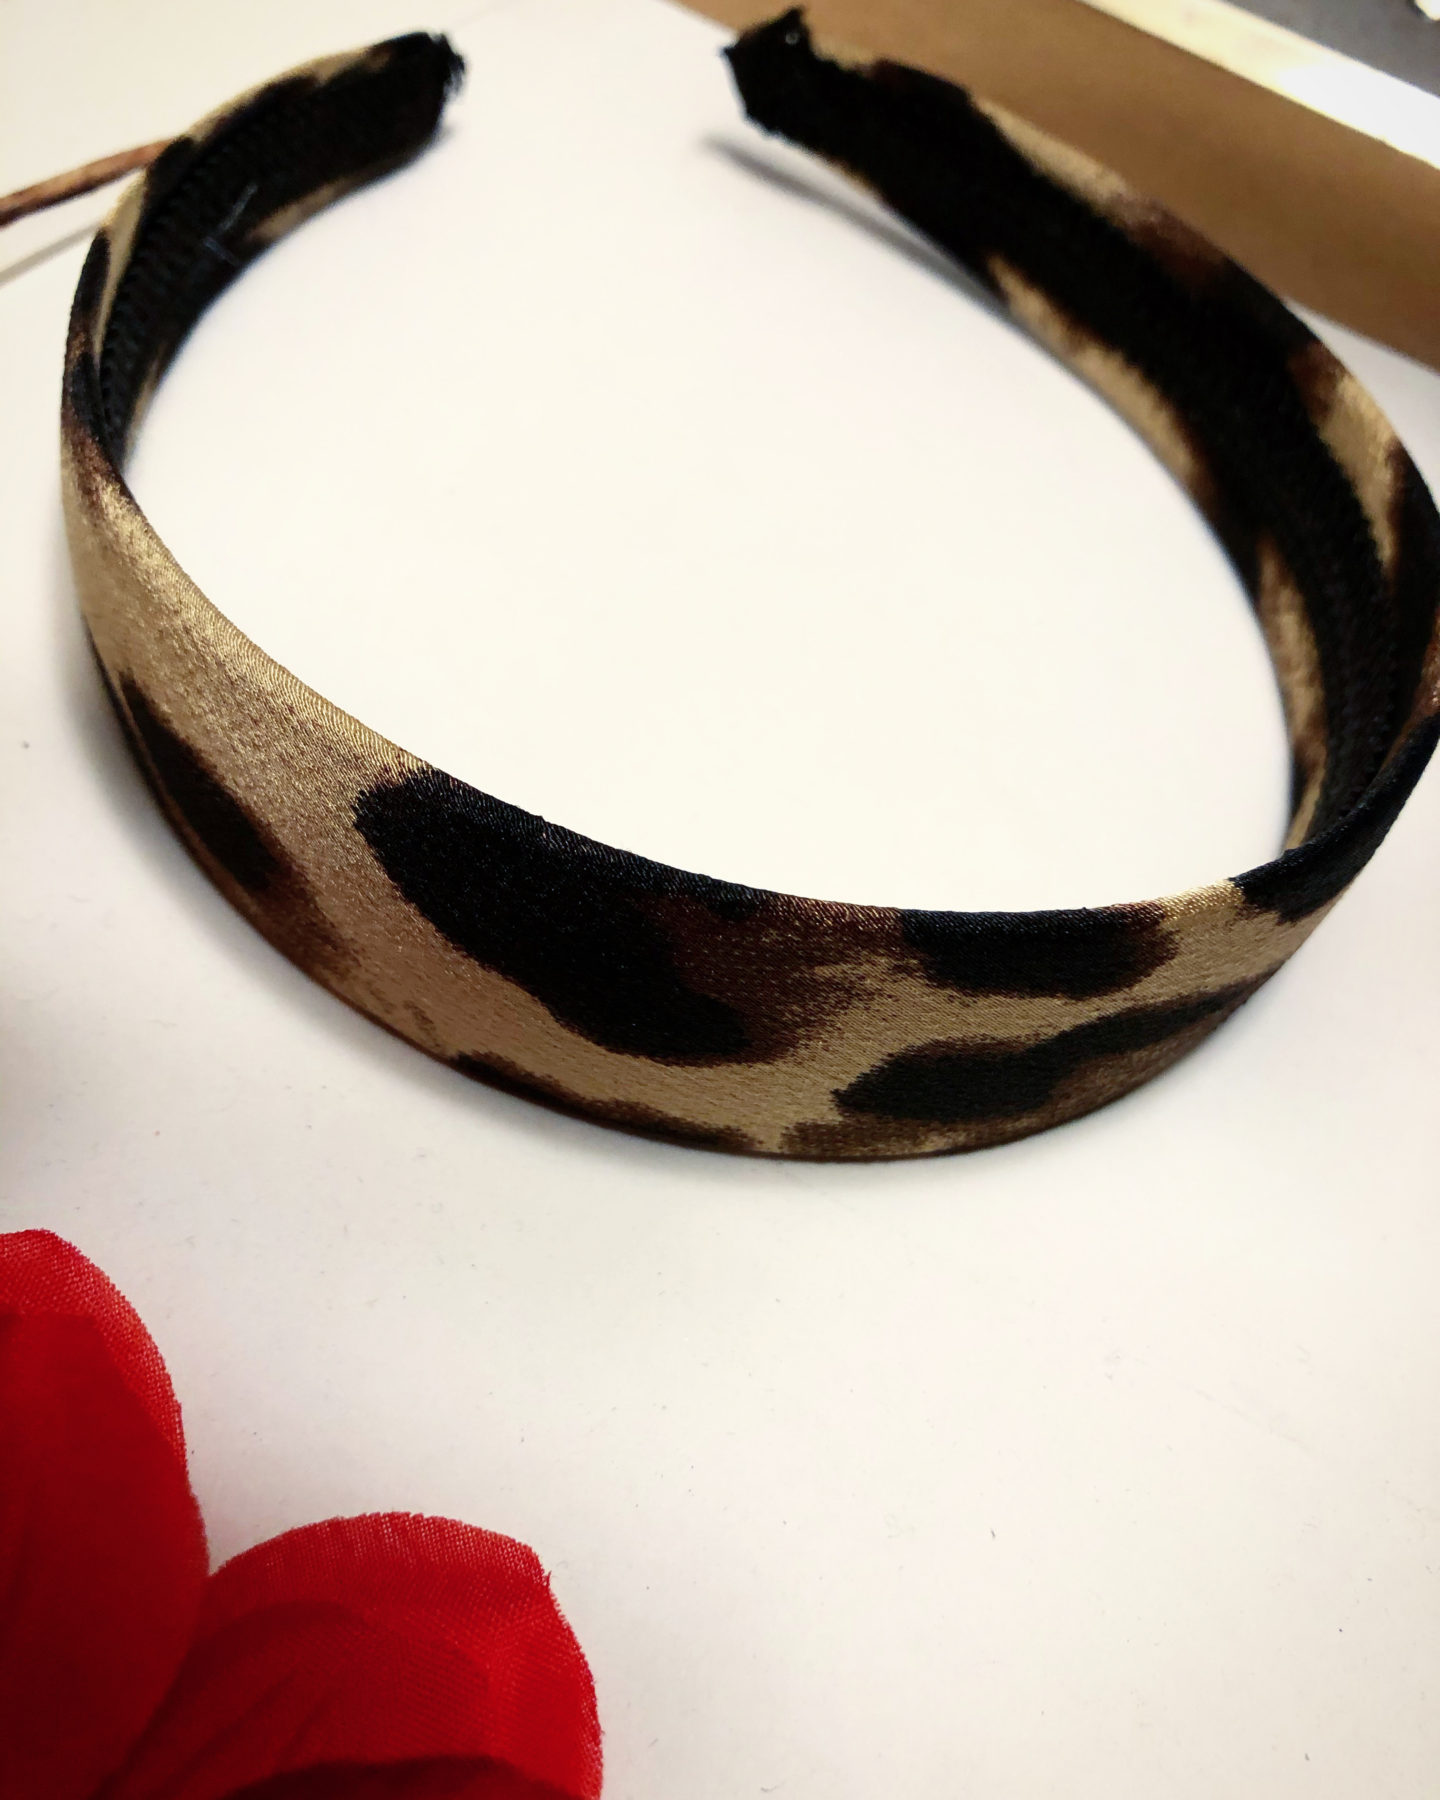
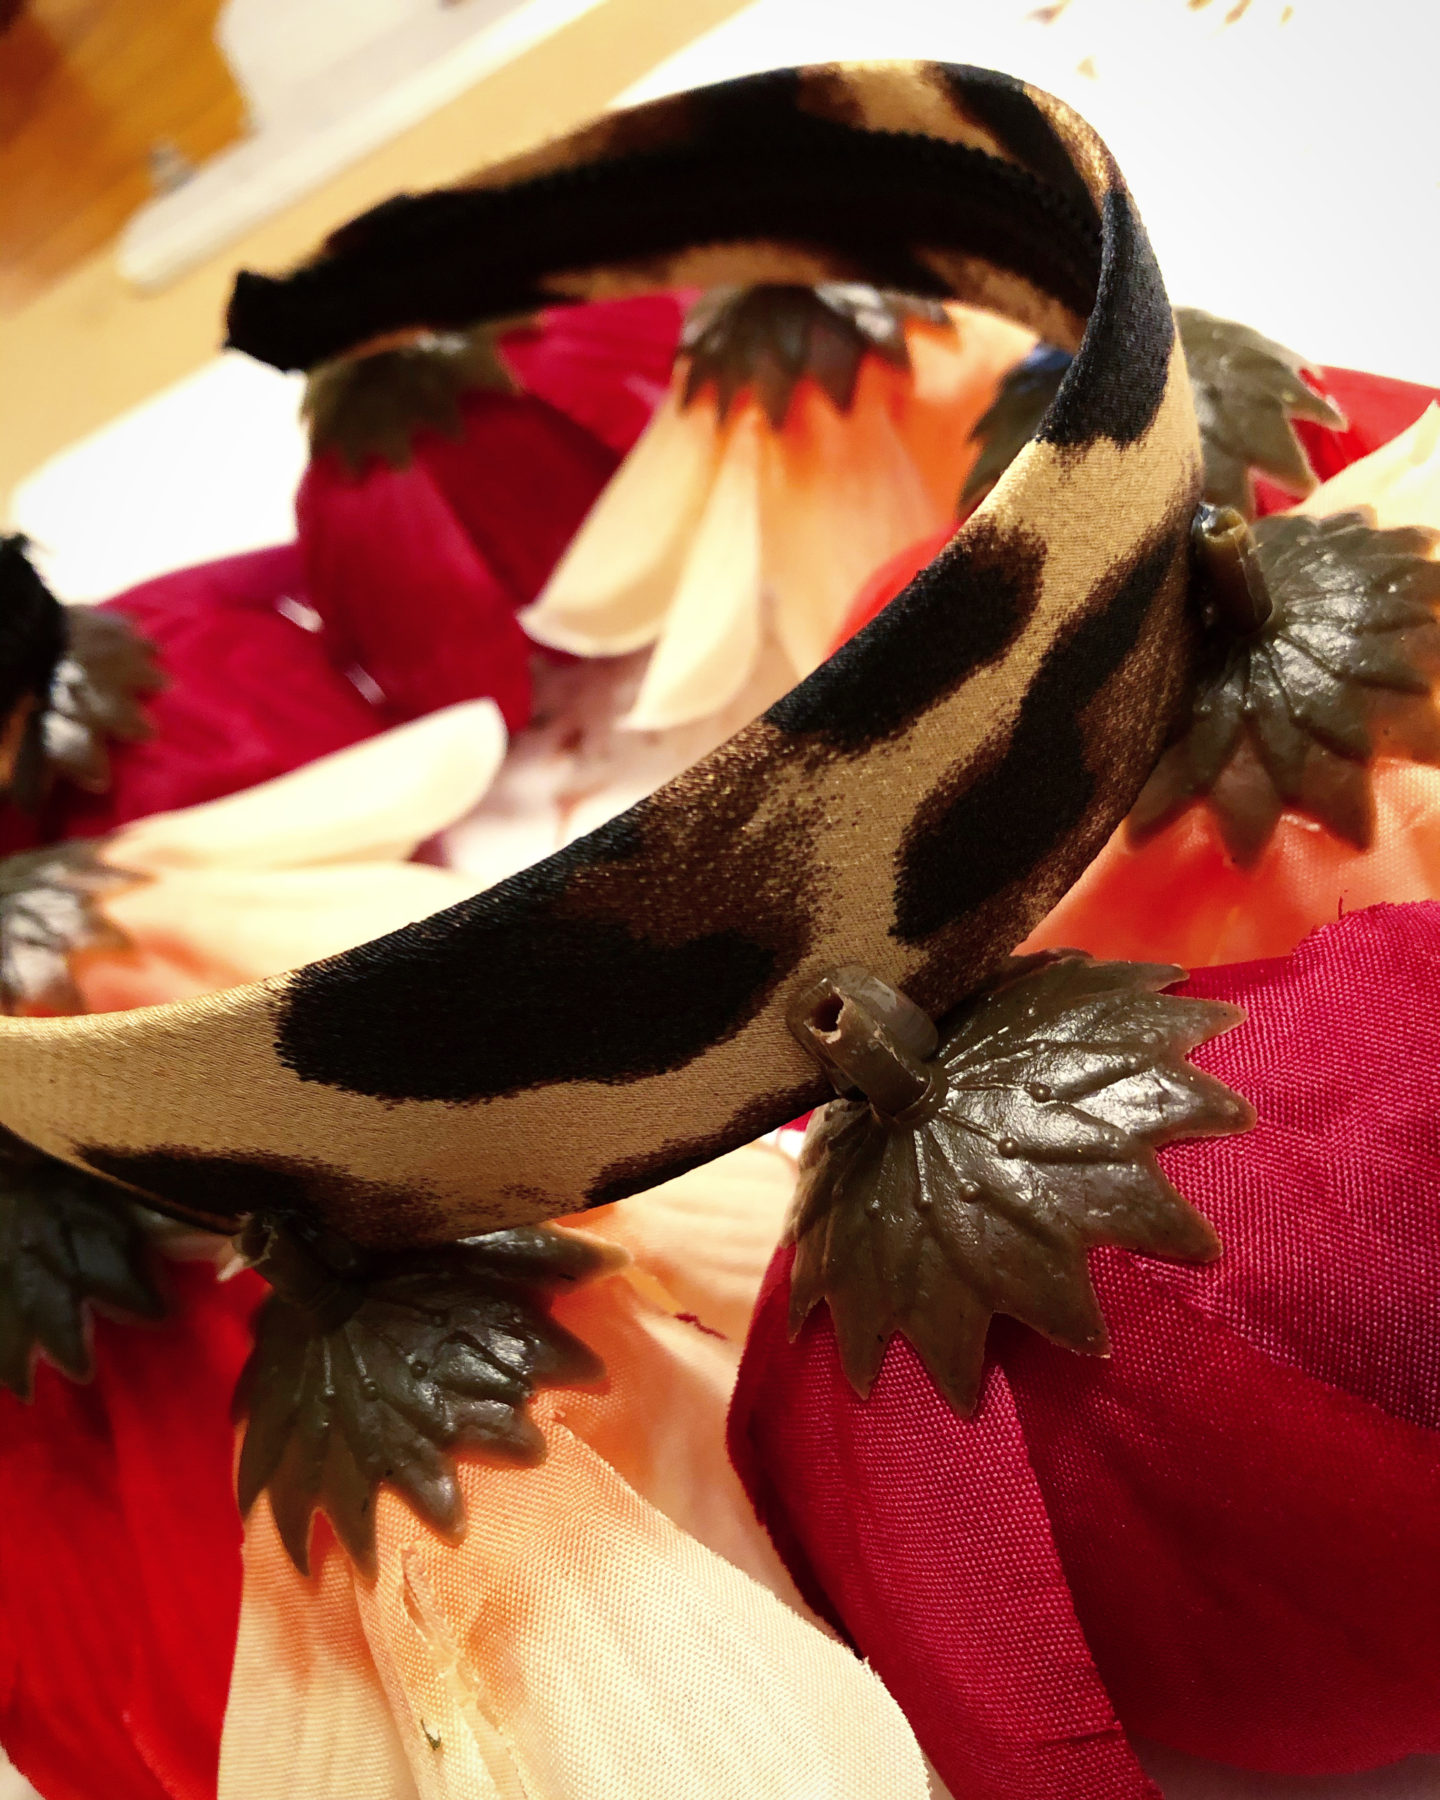
- Fabric head band from The Dollar Tree
- 3 bundles of flowers (3-4 types will suffice) from The Dollar Tree
- Crafts board or a protected surface
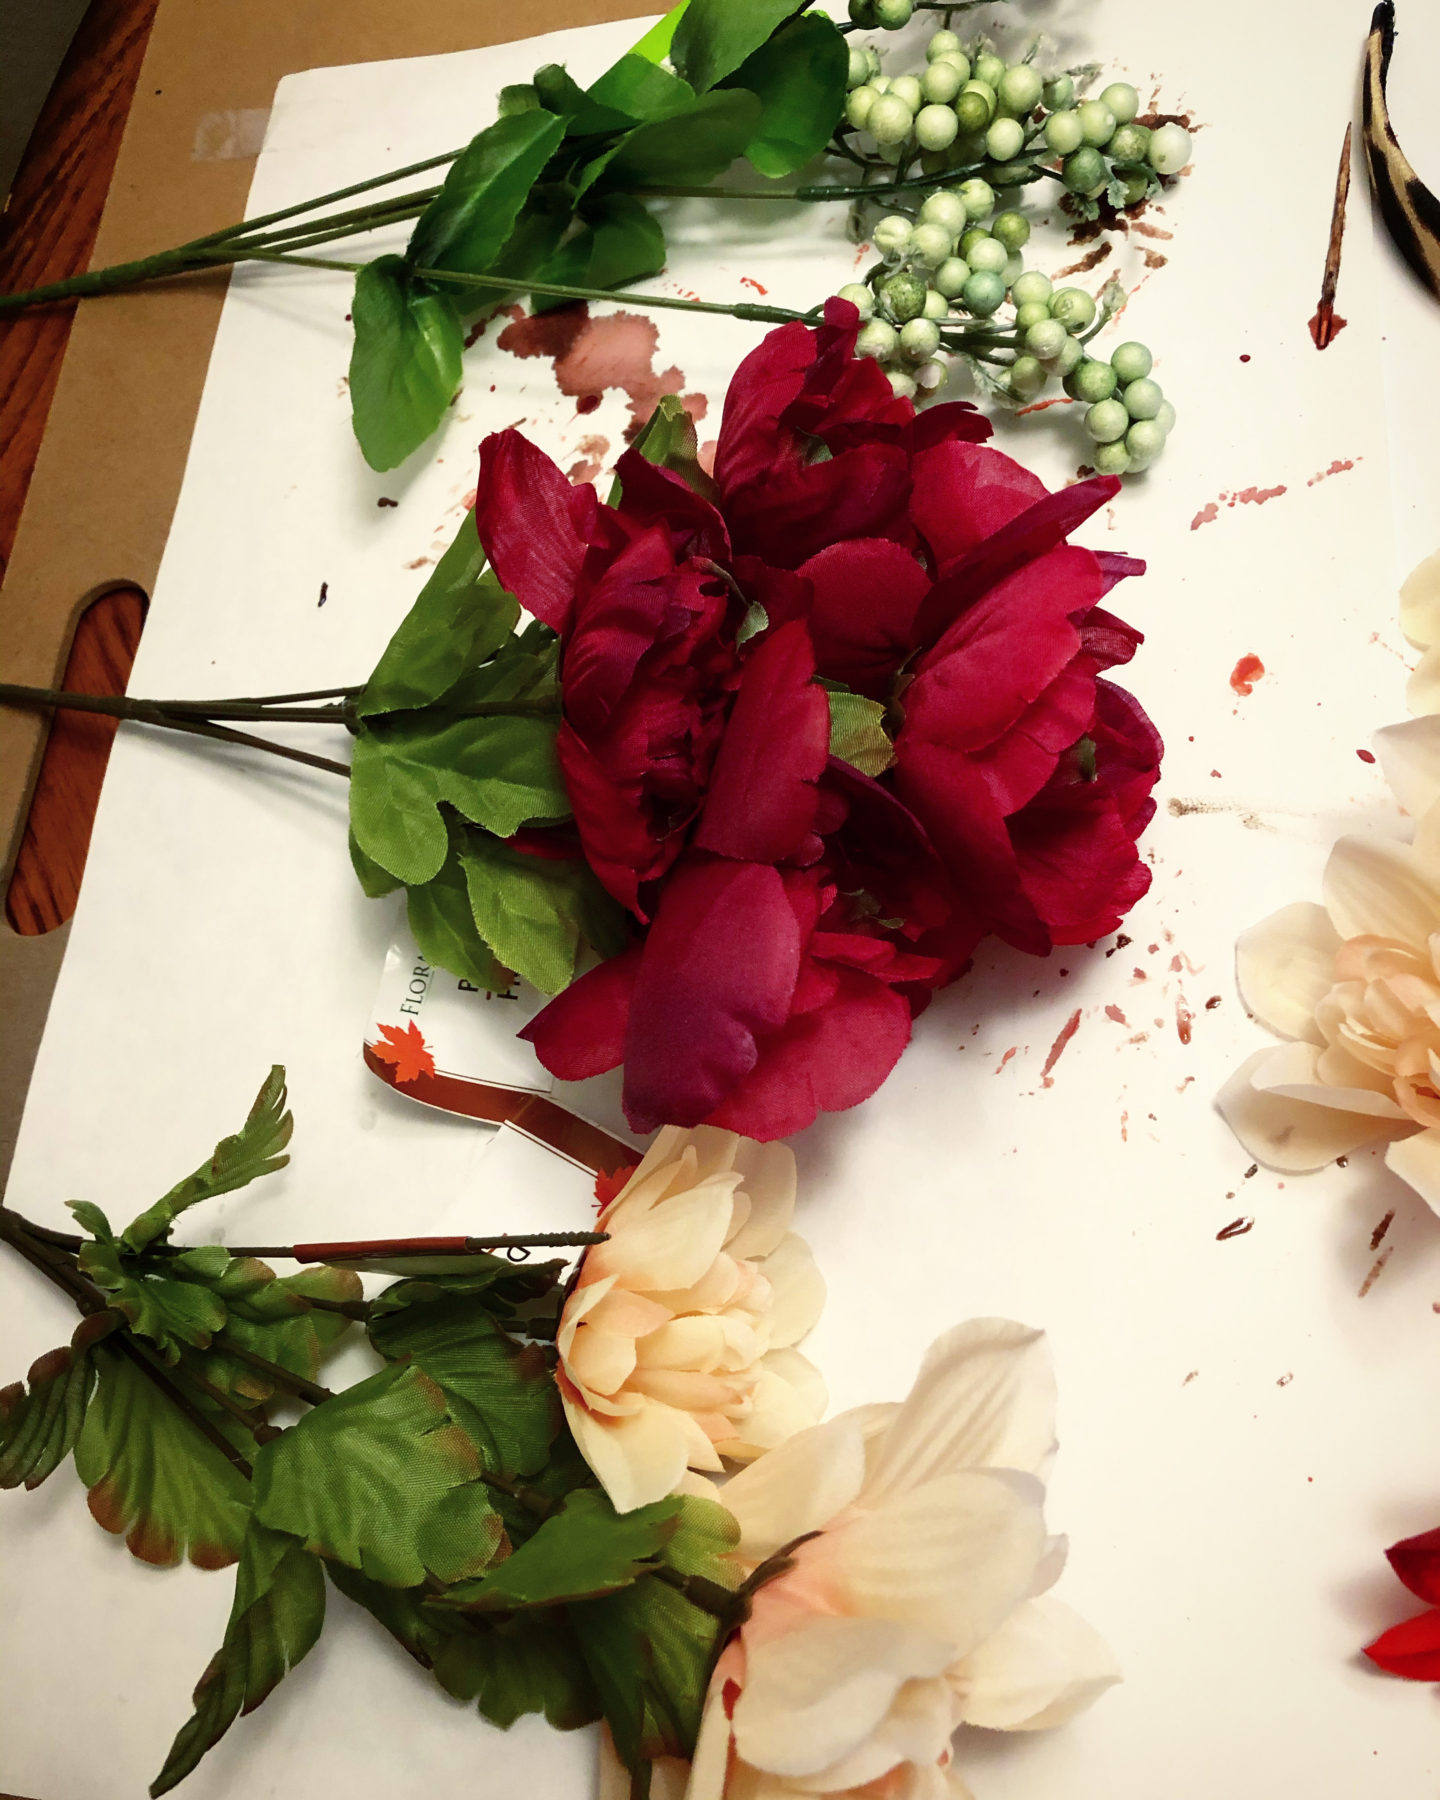
Step 1: Begin pulling off the flower buds from the stem. In the end, I opted not to include the berries and I only focused on the flowers. Lay them all out and begin arranging the pattern of color you would like.
One reason I purchased a fabric headband is because I found it easier with the gluing than having to glue on a plastic headband. When choosing your flowers, have your outfit in mind. If you’re doing all black, then any colors would work together. However, if your dress will be a floral print, try to find flowers that will match or compliment your dress.
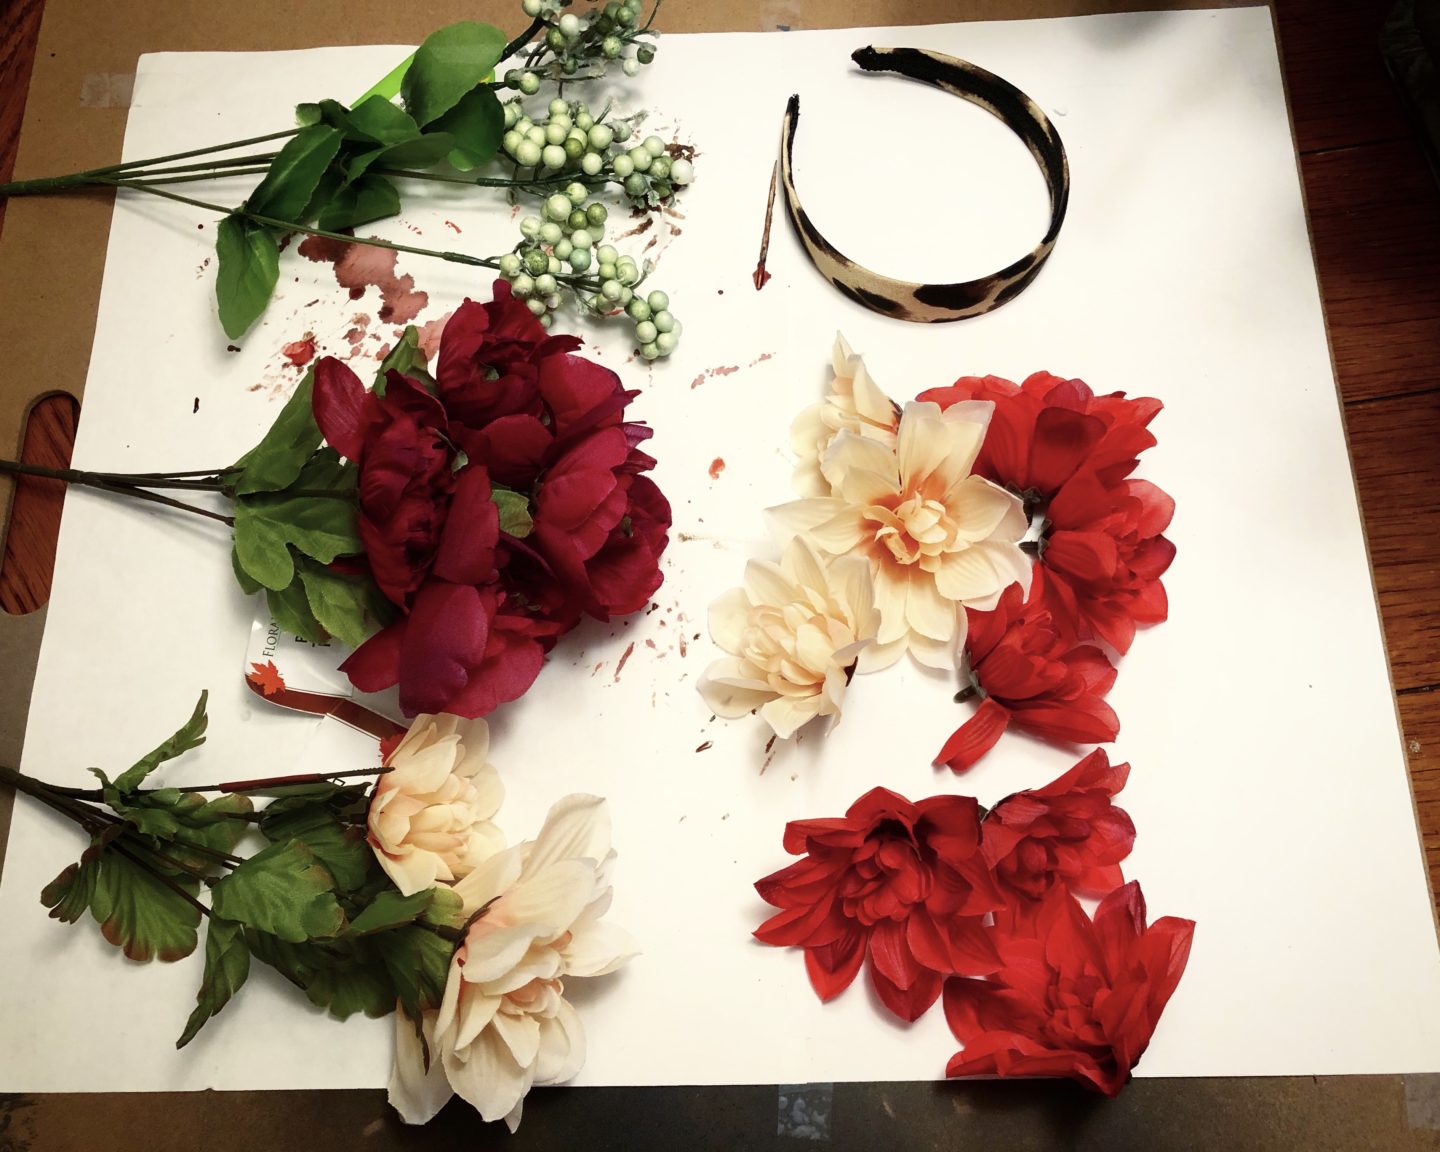
Step 2: Begin gluing each individual flower on one side of the headband. Hold each flower for a few seconds until it’s secure before moving on to the next flower. Once you have one side glued, repeat on the other side. Tip: Add extra glue over the stems for extra hold.
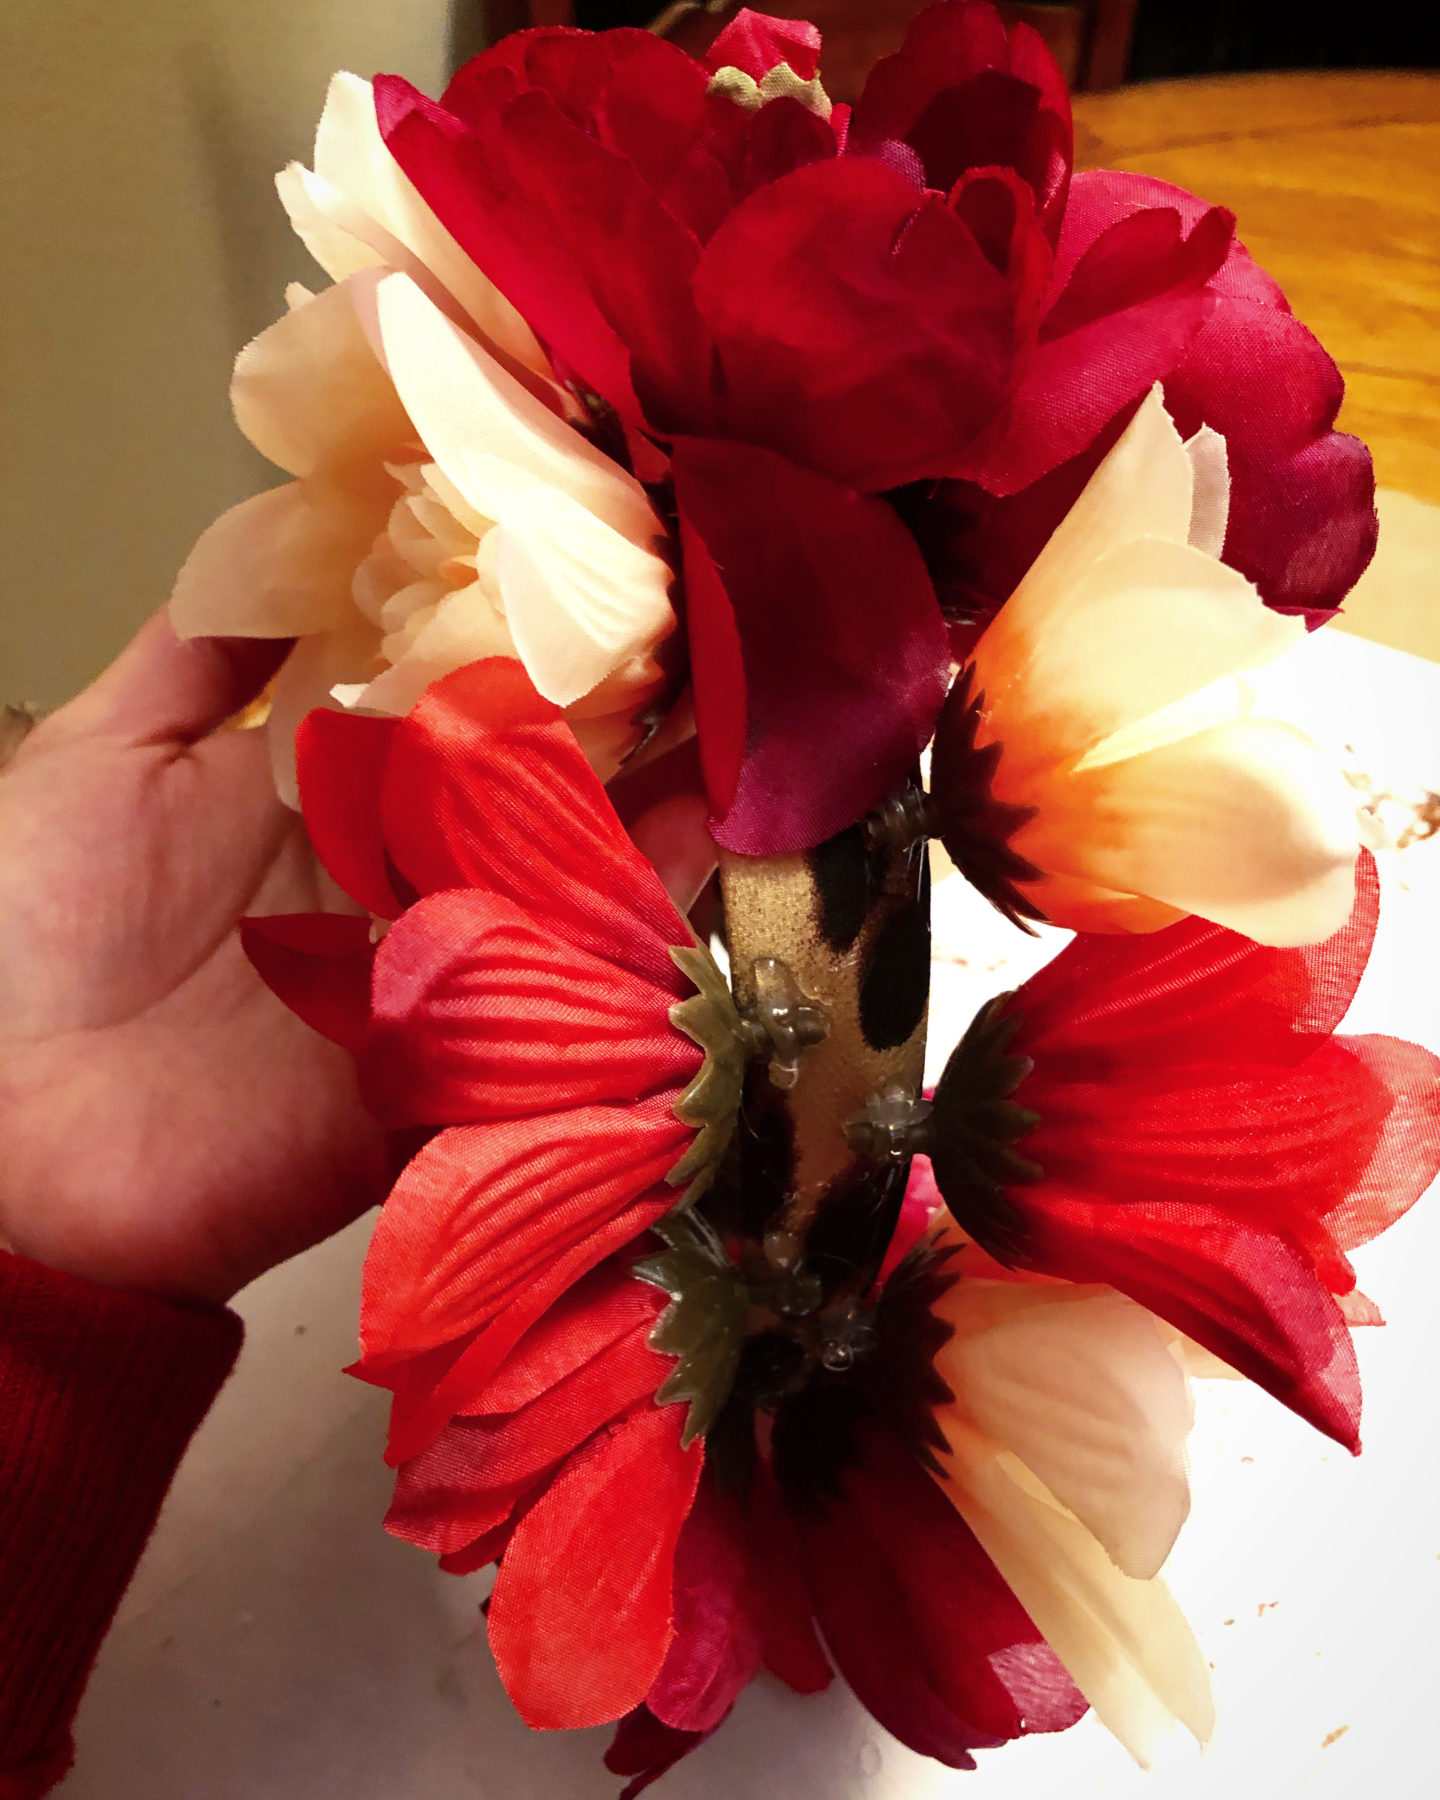
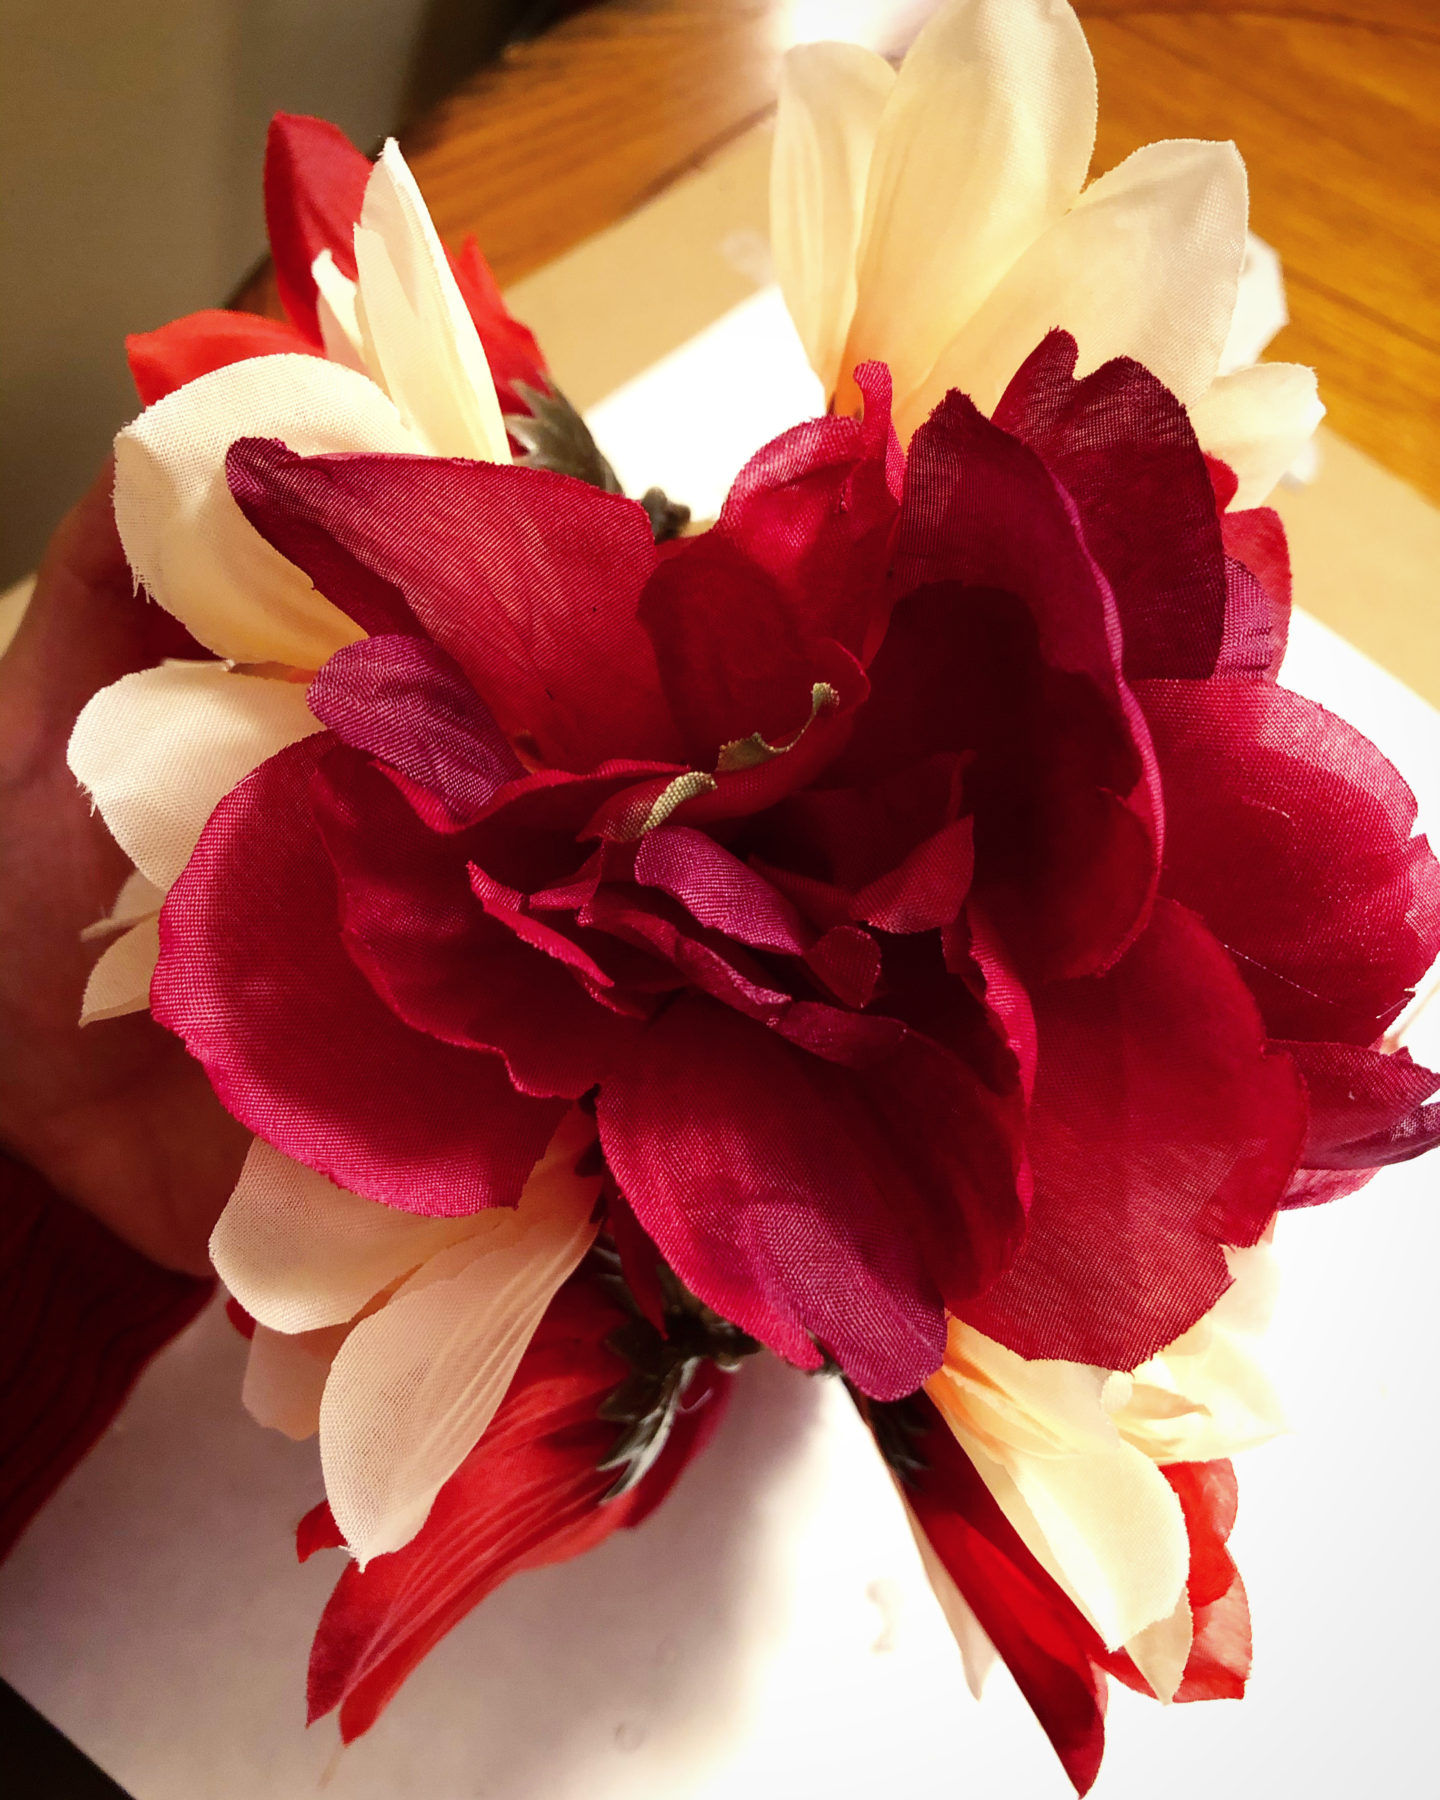
Step 3: If you have flowers left over, glue them on the upper part of the head band. In this case, I only had one flower left, so I just glued it on the top. I was fine with having the rest of the headband exposed as it didn’t really show once it was worn. So, whatever your preference is.
FACE – MAKEUP
Here is what I used:
- Hawaiian Tropic Weightless Face Oil-Free Lotion Sunscreen
- e.l.f. Total Face Sponge
- Becca Cosmetics Ever-Matte Poreless Priming Perfector
- Maybelline Fit Me! Matte + Poreless Foundation in 102 Fair Porcelaine
- Maybelline Super Stay Multi-Use Foundation Stick in 380 Espresso
- e.l.f. HD Lifting Concealer in Fair
- Maybelline Brow Perfecting Highlighter in 310 Medium
- e.l.f. Intense Ink Eyeliner in Blackest Black
- Maybelline Master Kajal Eyliner in Onyx Rush
- Butter London Blush in Hibiscus
- M.A.C Prep + Prime 24-Hour Extend Eye Base
- M.A.C. Matte eyeshadow in Malt
- M.A.C. Frost eyshadow in Cranberry
- M.A.C. Dazzleshadow in Slow/Fast/Slow
- ColourPop Super Shock Shadow in Stereo
- Maybelline The Nudes eyeshadow palette
- Arbonne It’s a Long Story Mascara
- Revlon Kiss Exfoliating Balm
- M.A.C. Prep + Prime Lip
- Ofra Lipliner in Wine
- NYX Butter Lipstick in Pops Explosif
- Urban Decay De-Slick Oil Control Makeup Setting Spray
Step 1: Create a clean canvas
First things first, wash your face. You want to make sure your face is clean from dirt and makeup. Think of your face as a canvas. It’s easier to paint over a new canvas than a dirty one.
Step 2: Protect your canvas
Skin cancer scares me, so I make it a daily ritual to wear sunscreen, even during the colder and gloomy months. We’re constantly exposed to the sun, even if we don’t see it. So, use protection!
Step 3: Smooth your canvas
A face primer is everything. I heard once that your foundation should never touch your skin. What is meant by this? Imagine you’re adding an extra layer that separates your face from the foundation. Would you rather have foundation touching your skin or would you rather have foundation covering the layer that is smoothing & protecting your skin?
It really makes all the difference in the world. Not only by separating the foundation from your skin, but also smoothing out the canvas and making your makeup last longer. With a smooth canvas, it makes it easier to apply the foundation all over your face.
Step 4: Start painting
I’m not really into the whole face paint. It’s great for those who want their face extremely white, but I’m all about creating a look that will be easy to remove and using makeup products that you can use again at any given point in time. Face paint can clog your pores, so regular foundation is the way to go without risking any cracking or smudging on your clothes.
When I first attempted the look during a practice trial, I had used my fingers to apply my foundation. It didn’t like the overall finish and I had to apply extra foundation to cover up any gaps. So, I used a makeup sponge instead and it added extra coverage. I kept the jaw line a tad lighter and the rest I added extra foundation to make it look a little whiter.
I wanted to “cover” my dark circles, so I applied a little bit of concealer. The irony of trying to look dead. I also applied my brow highlighter on the brow bone and applied some over my eyebrows to create a base and this way my brows would be hidden later on.
Step 5: Create the lines
I had no idea what I was doing at this point, so I would say go with your intuition and let the lines lead you. What I did know for sure, is I wanted to create a little definition. I accomplished this by shadowing.
Take the foundation stick and apply a small line on the hollows of your jaw. Use the sponge to blend the line you just drew. This step is basically trying to contour the sides of your face to add depth.
Take the black pencil eyeliner and begin drawing a line going down the side of your face. You want to create the illusion of bones and a skull. Take the black color from the eyeshadow palette and begin adding a shadow going down the side of your face. Add a little below your bottom lip. Optional: create additional lines on your chin.
Create another line and extend it to the sides of your lips. This will be become part of the mouth and draw lines with the pen eyeliner to make it look like stitches. The smallest detail goes a long way.
You’ll want to outline your lips with the lip pencil at this point and apply lipstick so you can add the rest of the lines over your lips. Before doing so, be sure to use a lip scrub to smooth your lips. A lip primer can also go a long way to make your lipstick last.
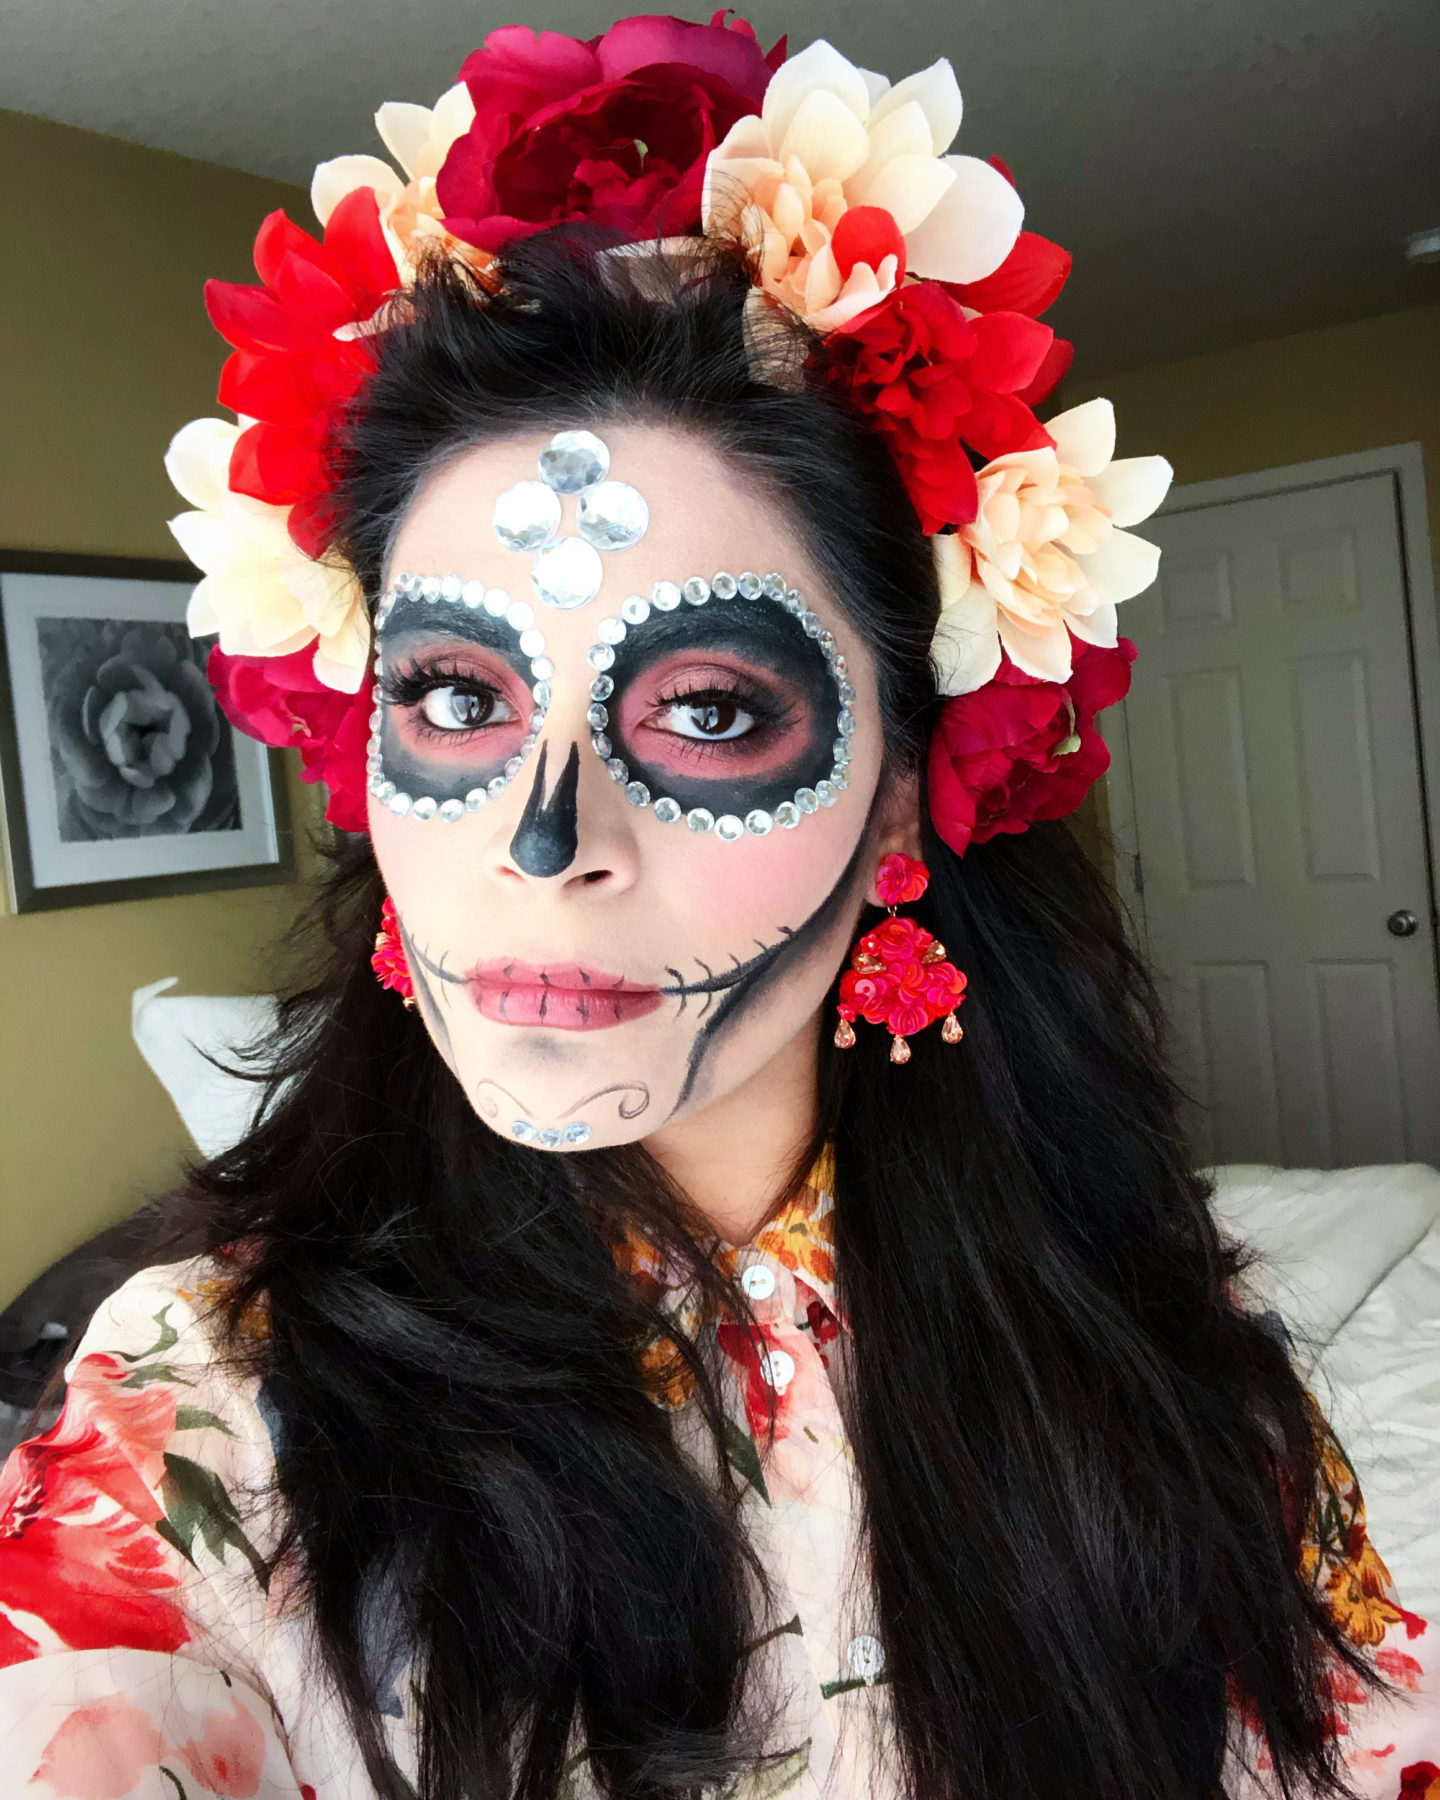
Step 6: Create the circles around your eyes
Using the pencil eyeliner, draw a large circle around each eye. Be sure to cover your eyebrows at this point so they can blend in with the illusion of hollow eyes. Apply eye primer all over your lids.
Take the M.A.C. eyeshadow in “Malt” to create a nude base all over your lid. This will intensify the color. Huge tip for daily wear.
Apply M.A.C. eyeshadow in “Cranberry” all of your lid and extending below your bottom lash line. Go all out at this point as you’ll want to extend the color. This will be the main focal point of the entire look.
Finish the lid off with some glitter by applying a bit of M.A.C. eyeshadow in “Slow/Fast/Slow”. This will create a highlight on the center of your eyes for an extra pop. The two colors go perfectly well together. Finish off with applying the ColourPop’s shadow in “Stereo” on the crease for definition.
You’ll then apply fill in the gaps with black eye shadow. Tip: make the outer corners darker and lighten as you apply towards the center of the circle. This will add in extra depth from the shadowing.
Create a winged look on your lid by using the pen eyeliner. This will make the falsies (fake lashes) blend in with your natural lashes. Curl your normal lashes and apply mascara. End the look by applying fake lashes. Be sure to add black pencil eyeliner to your bottom and upper waterline.
Step 7: Shape your nose
A skull isn’t a skull without a missing nose. Use the pencil eyeliner to draw in the V shape. This will last longer than using a liquid eyeliner and will stay in place.
Step 8: Set your makeup
I really like the Urban Decay setting spray. Since I have oily/combination skin, this really holds my makeup and keeps it all in place. This is key, especially after taking almost an entire hour preparing your face. If you’re going out to a party, an event, or just giving candy to trick-or-treaters, you’ll want to make sure the look lasts all night!
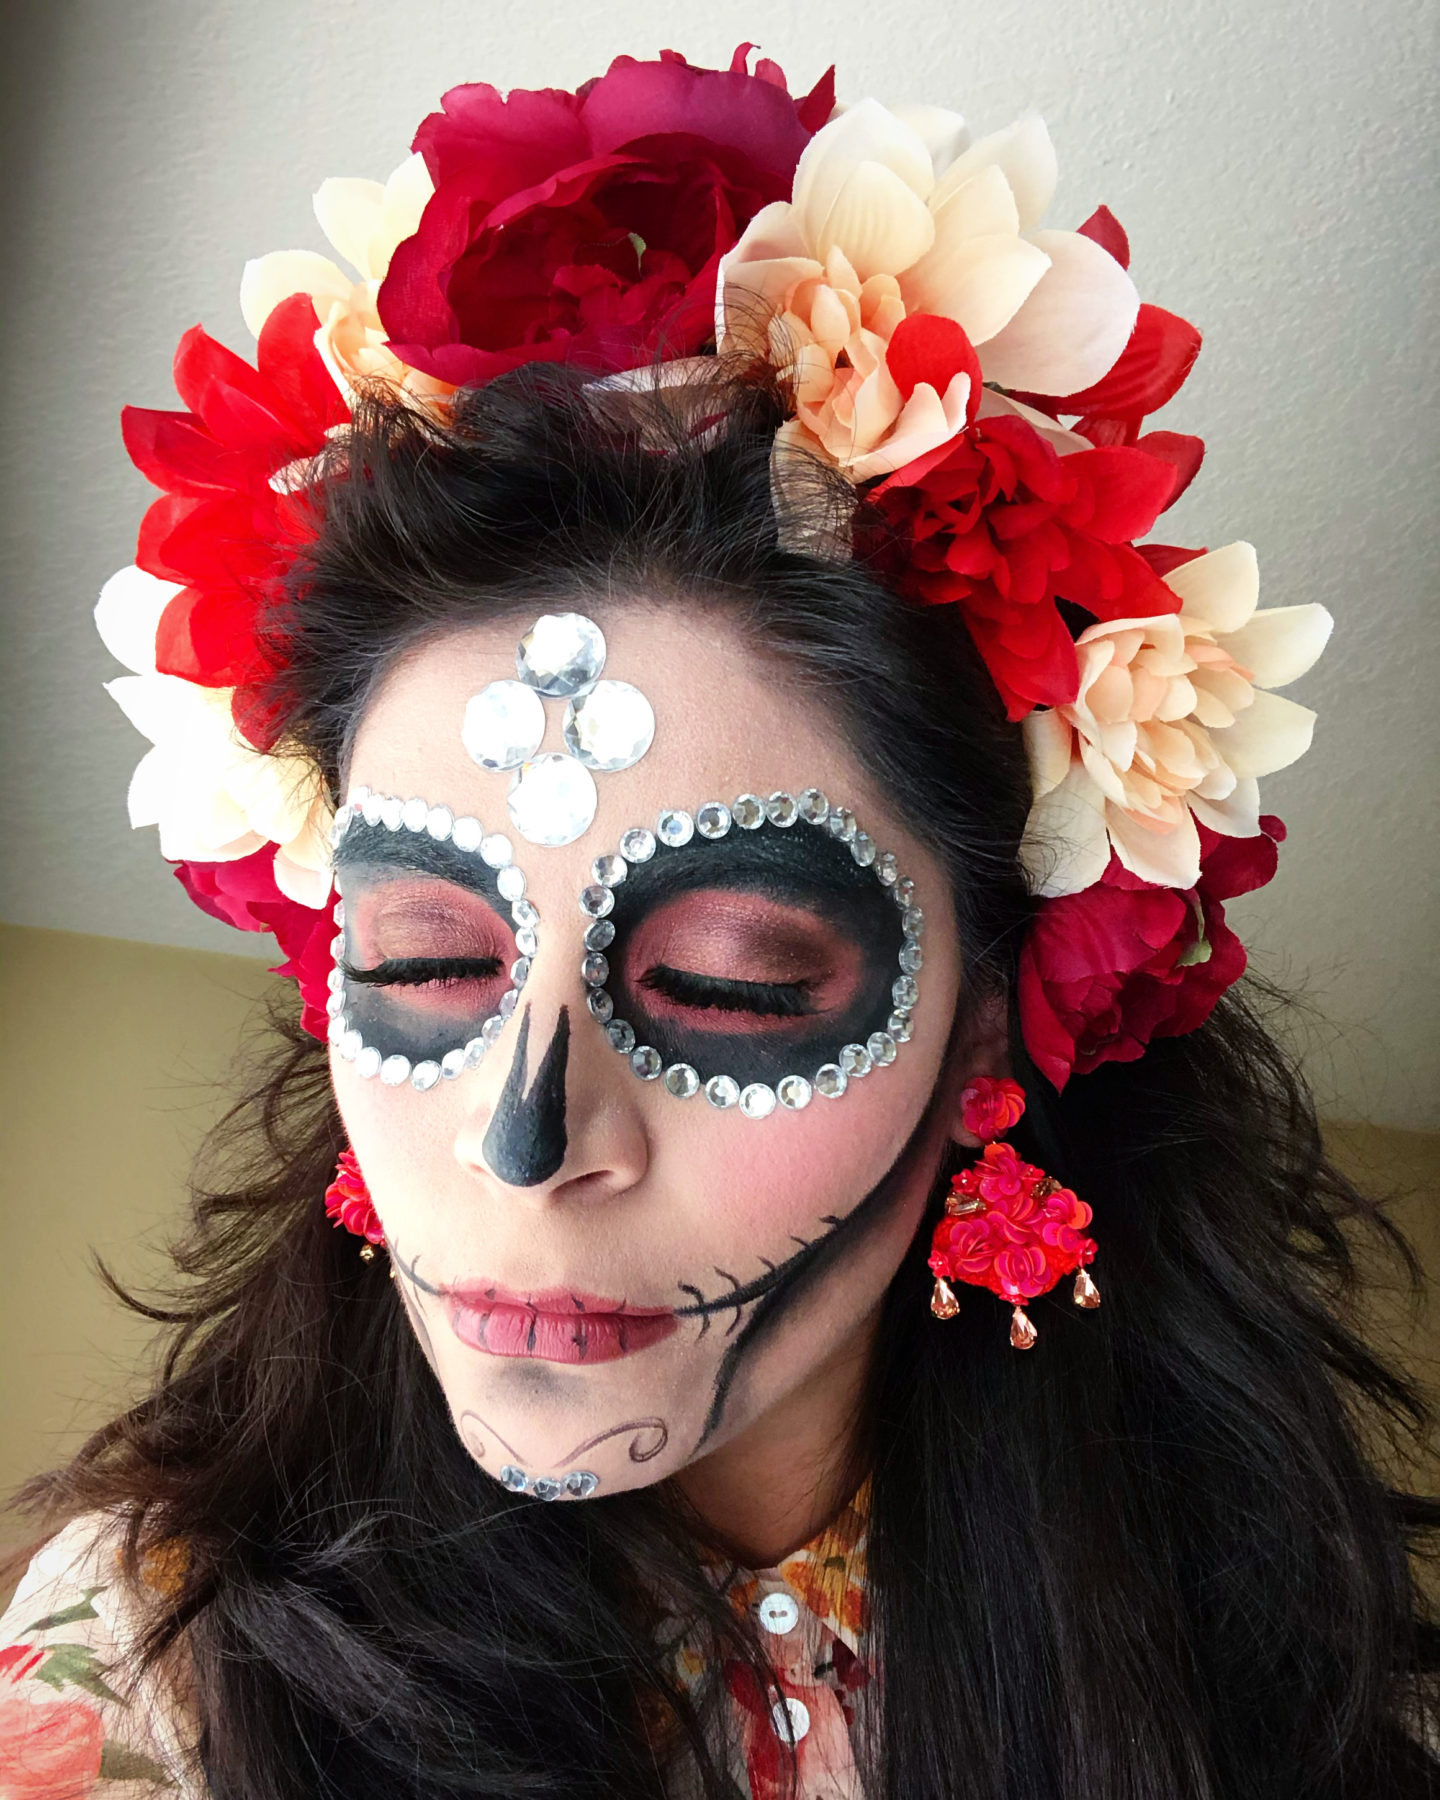
FACE – JEWELS
What you will need:
- Small to Medium sized jewels — purchased from JOANN
- Large jewels — purchased from Joanne’s
- Clear eyelash glue — purchased from Nordstrom Rack
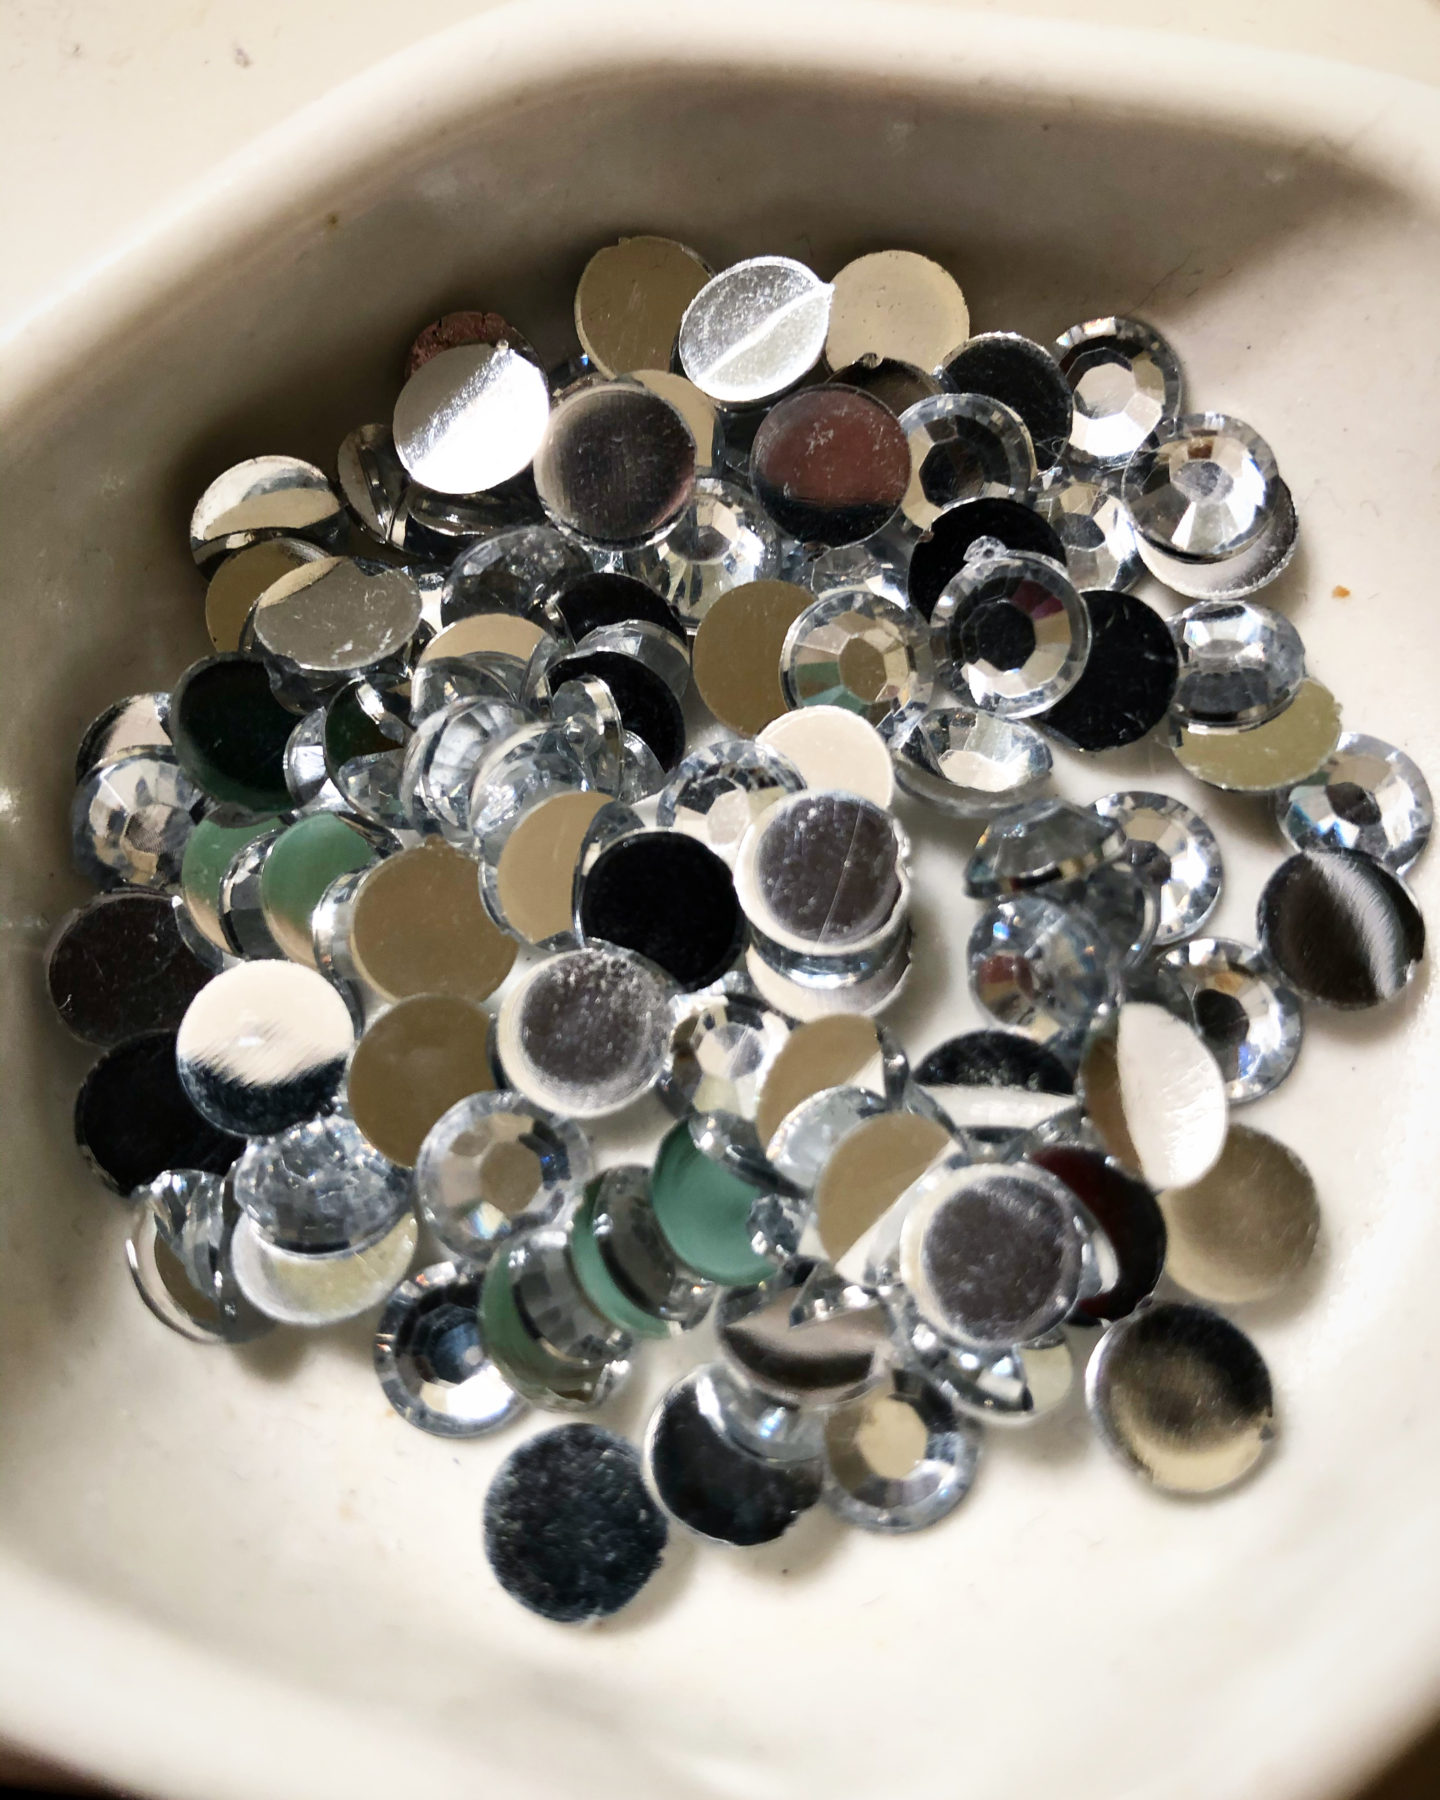
As I previously mentioned, adding the jewels was the most tedious throughout the preparation of this look. I would suggest having someone glue and place the jewels for you, but if there isn’t anyone around, you’ll need to be extra patient. The size and placement of the jewels is really up to you.
I really wanted larger jewels on the center of my forehead and smaller jewels surrounding my eyes. I wouldn’t go smaller as the smaller jewels will be very difficult to apply the glue and will only add extra time. There are different shapes of jewels, so be creative and take a break when you need to.
It’s crucial that you use CLEAR eyelash glue and not the WHITE eyelash glue. If you make a mistake or need to move the jewels around, you don’t want to have white glue appearing all over your face and seeping outside of the jewels. Clear eyelash glue will dry clear, so there’s no need to worry if you need to re-apply. Also, don’t use any other glue i.e. permanent glue or cement glue.
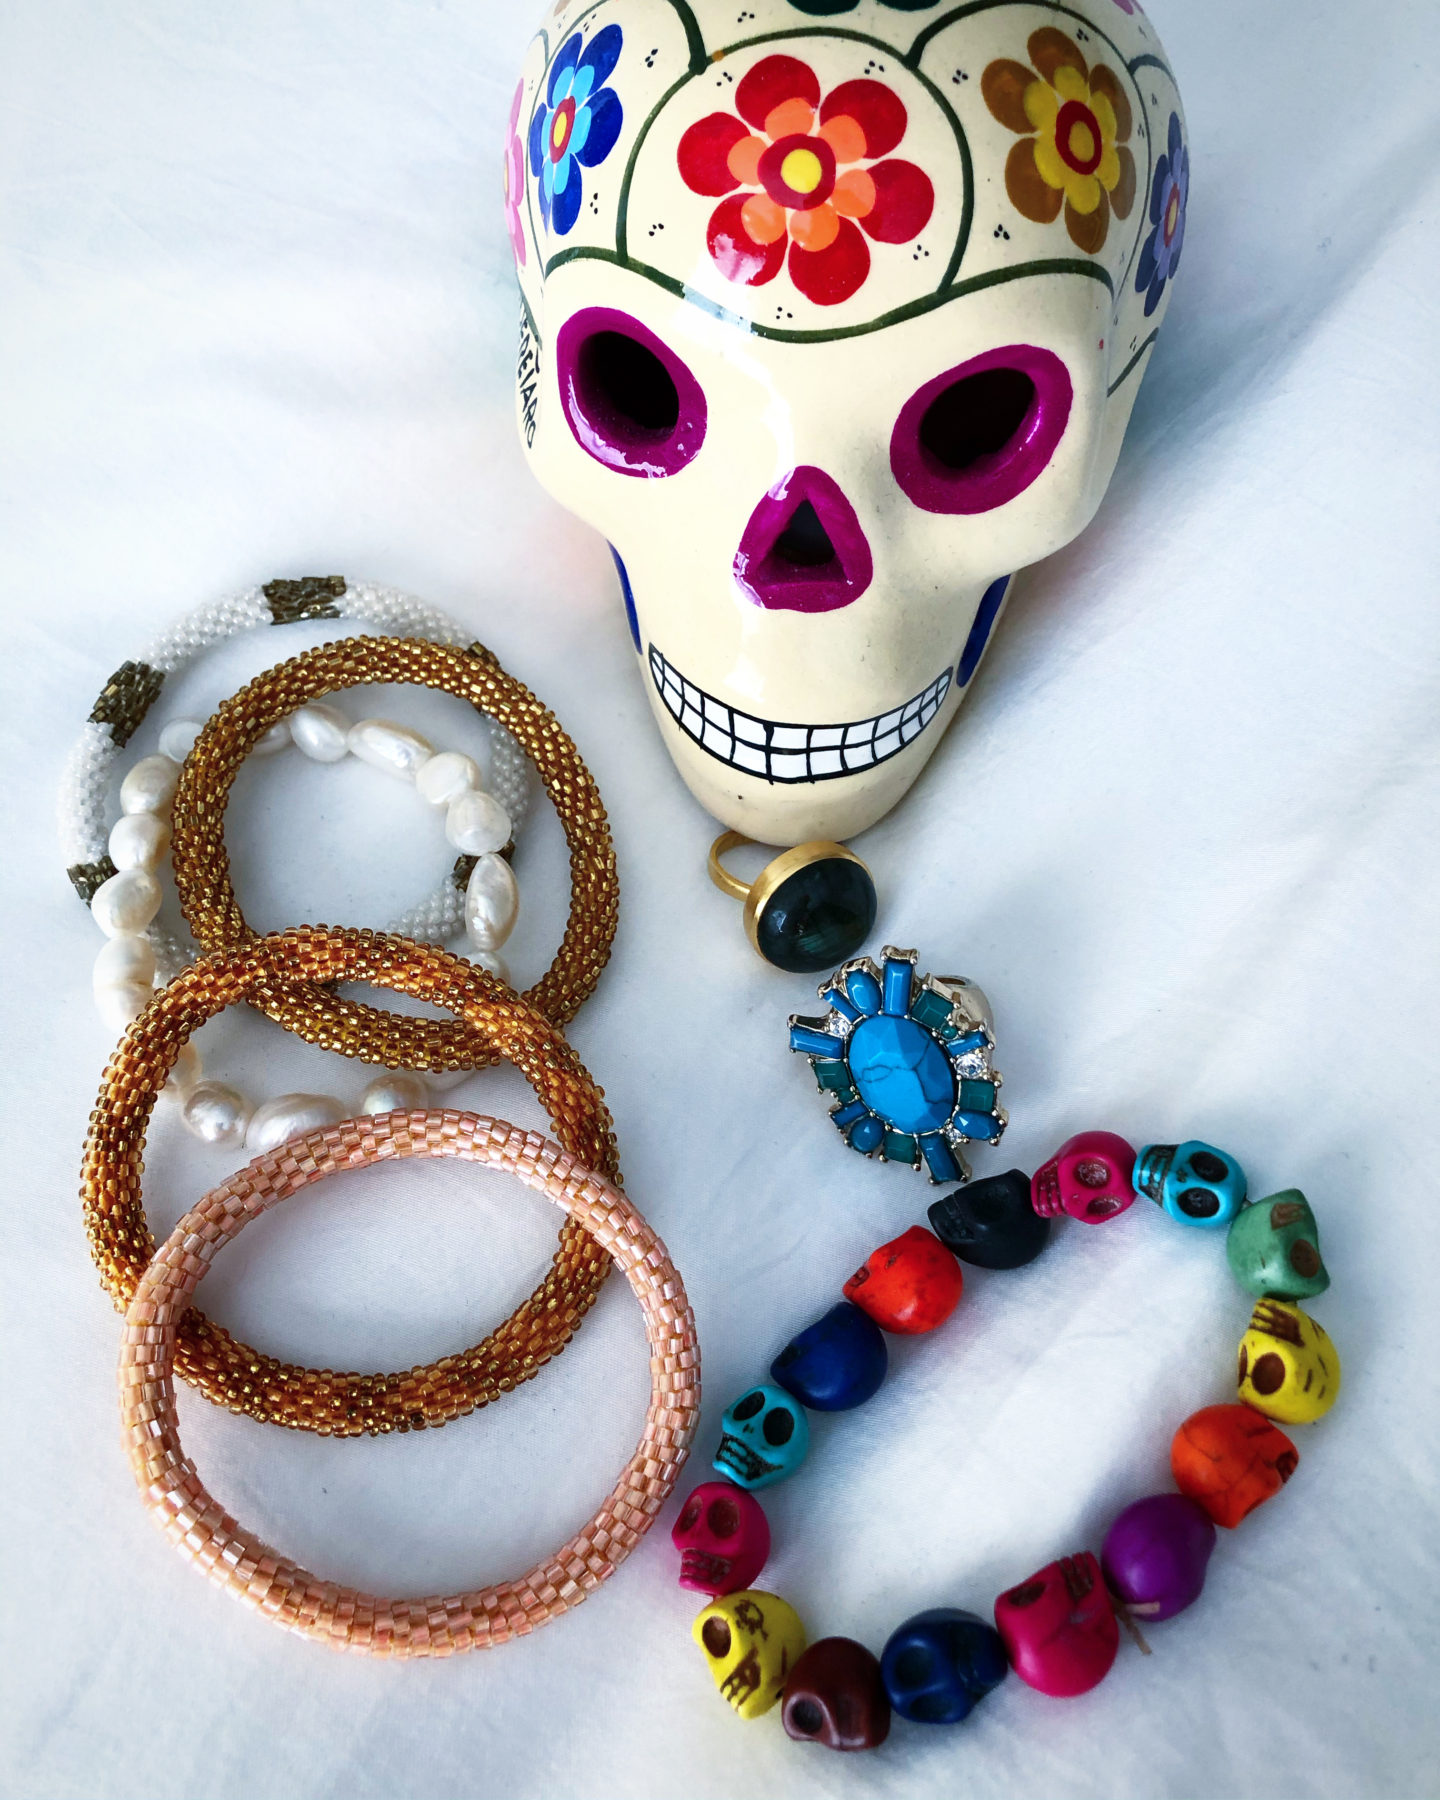
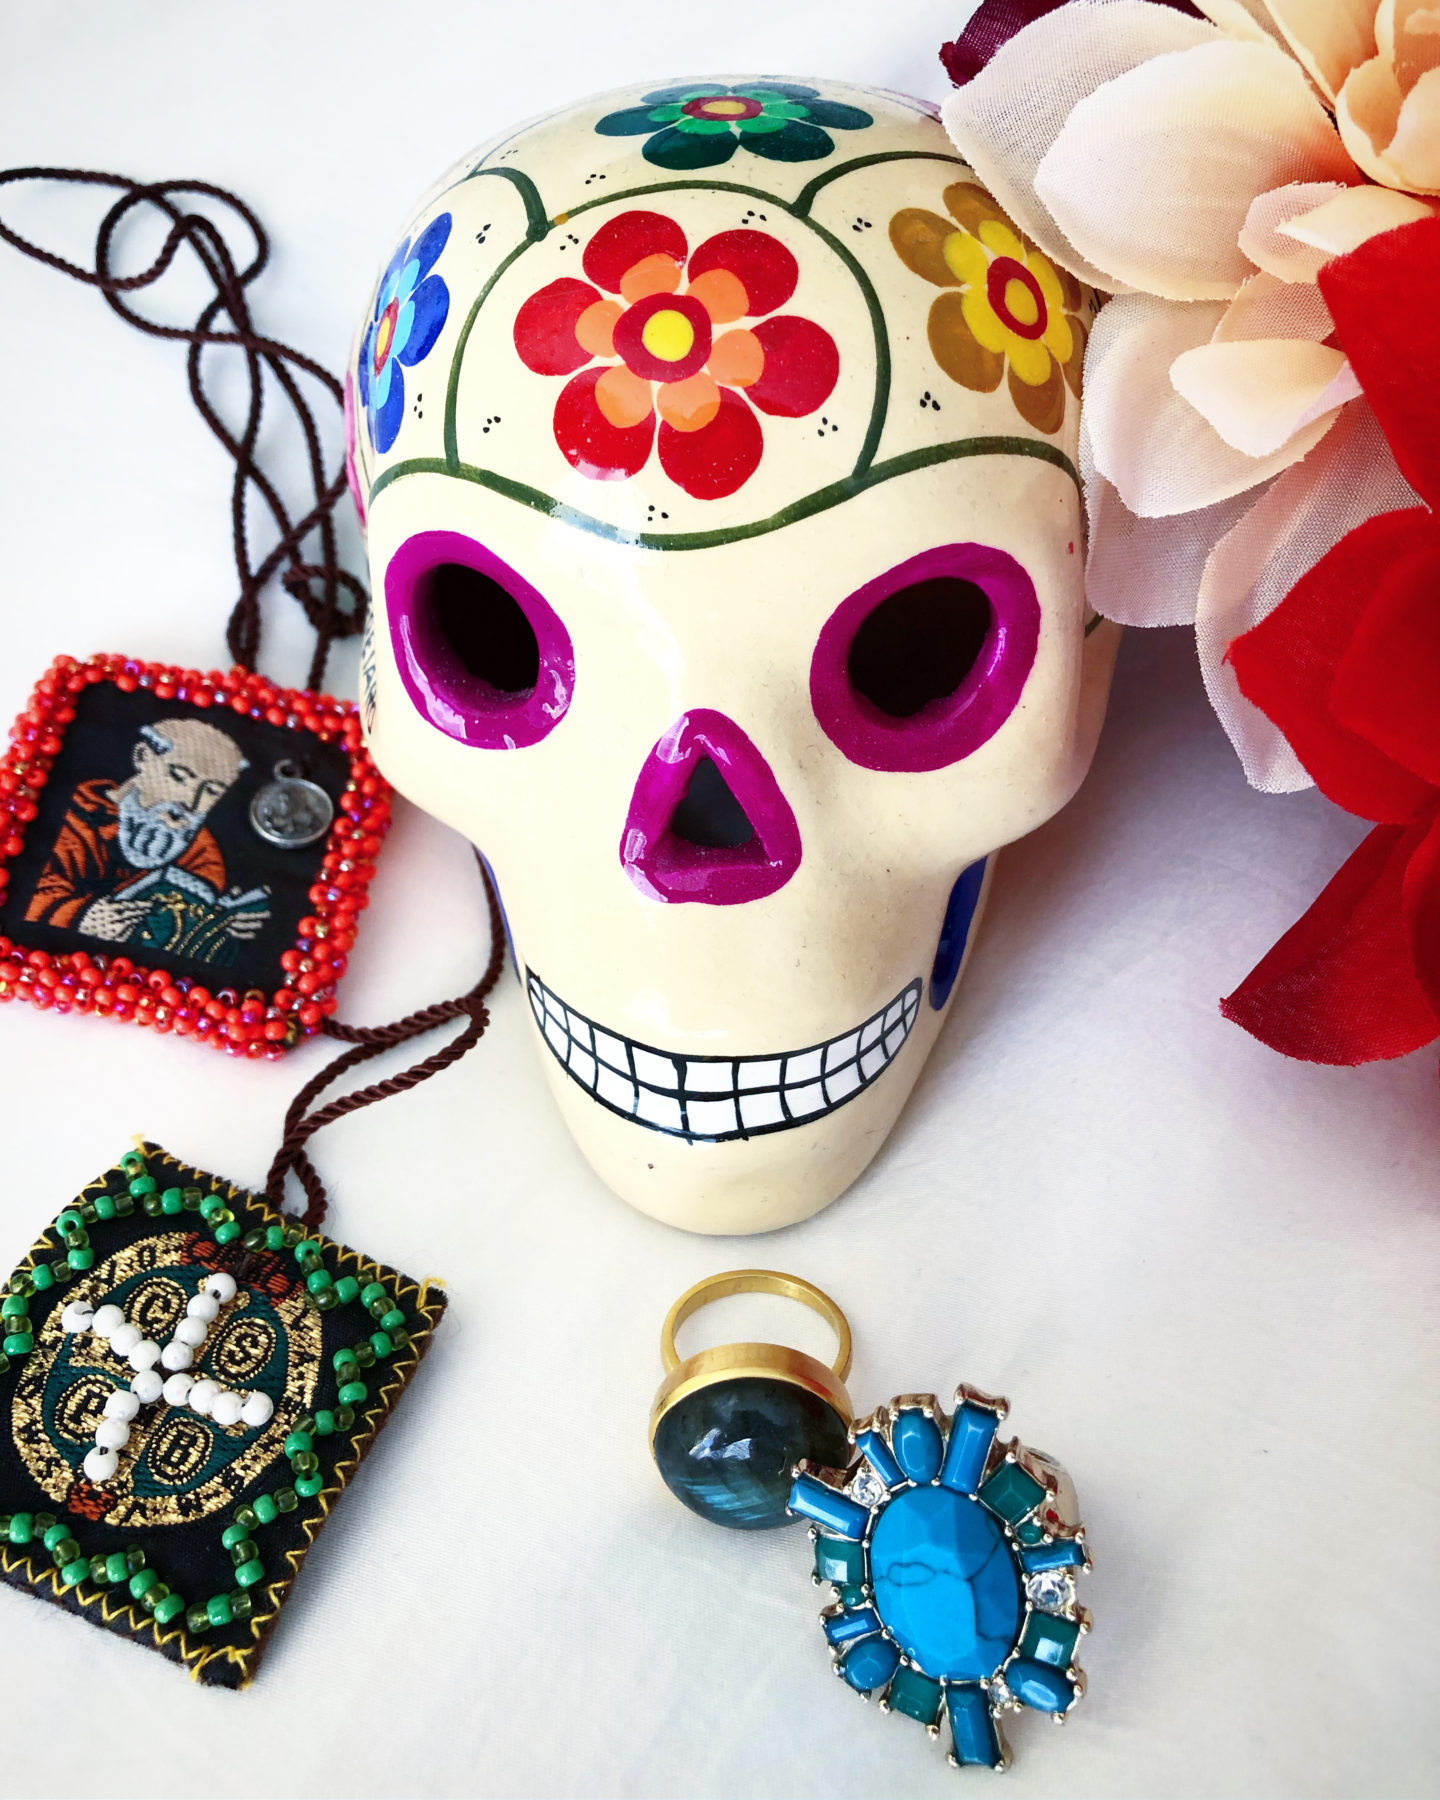
ACCESSORIES
What I used:
- Rings from Banana Republic
- Earrings from Ann Taylor
- Bangles and Bracelets from Nordstrom Rack & Mexico
- Skull Bracelet from Mexico
- Escapulario from Mexico
- Skull Candy Pottery from Mexico
I finished off this look with basic, but very colorful jewelry pieces. In addition, I wanted to incorporate some skulls and at least a cross in the look. I found an old skull bracelet that I purchased in Mexico and also a Escapulario that I wrapped around my neck. The earrings created an extra floral pop and they reminded me of the beautiful flowers that are used during the festive days in Mexico.
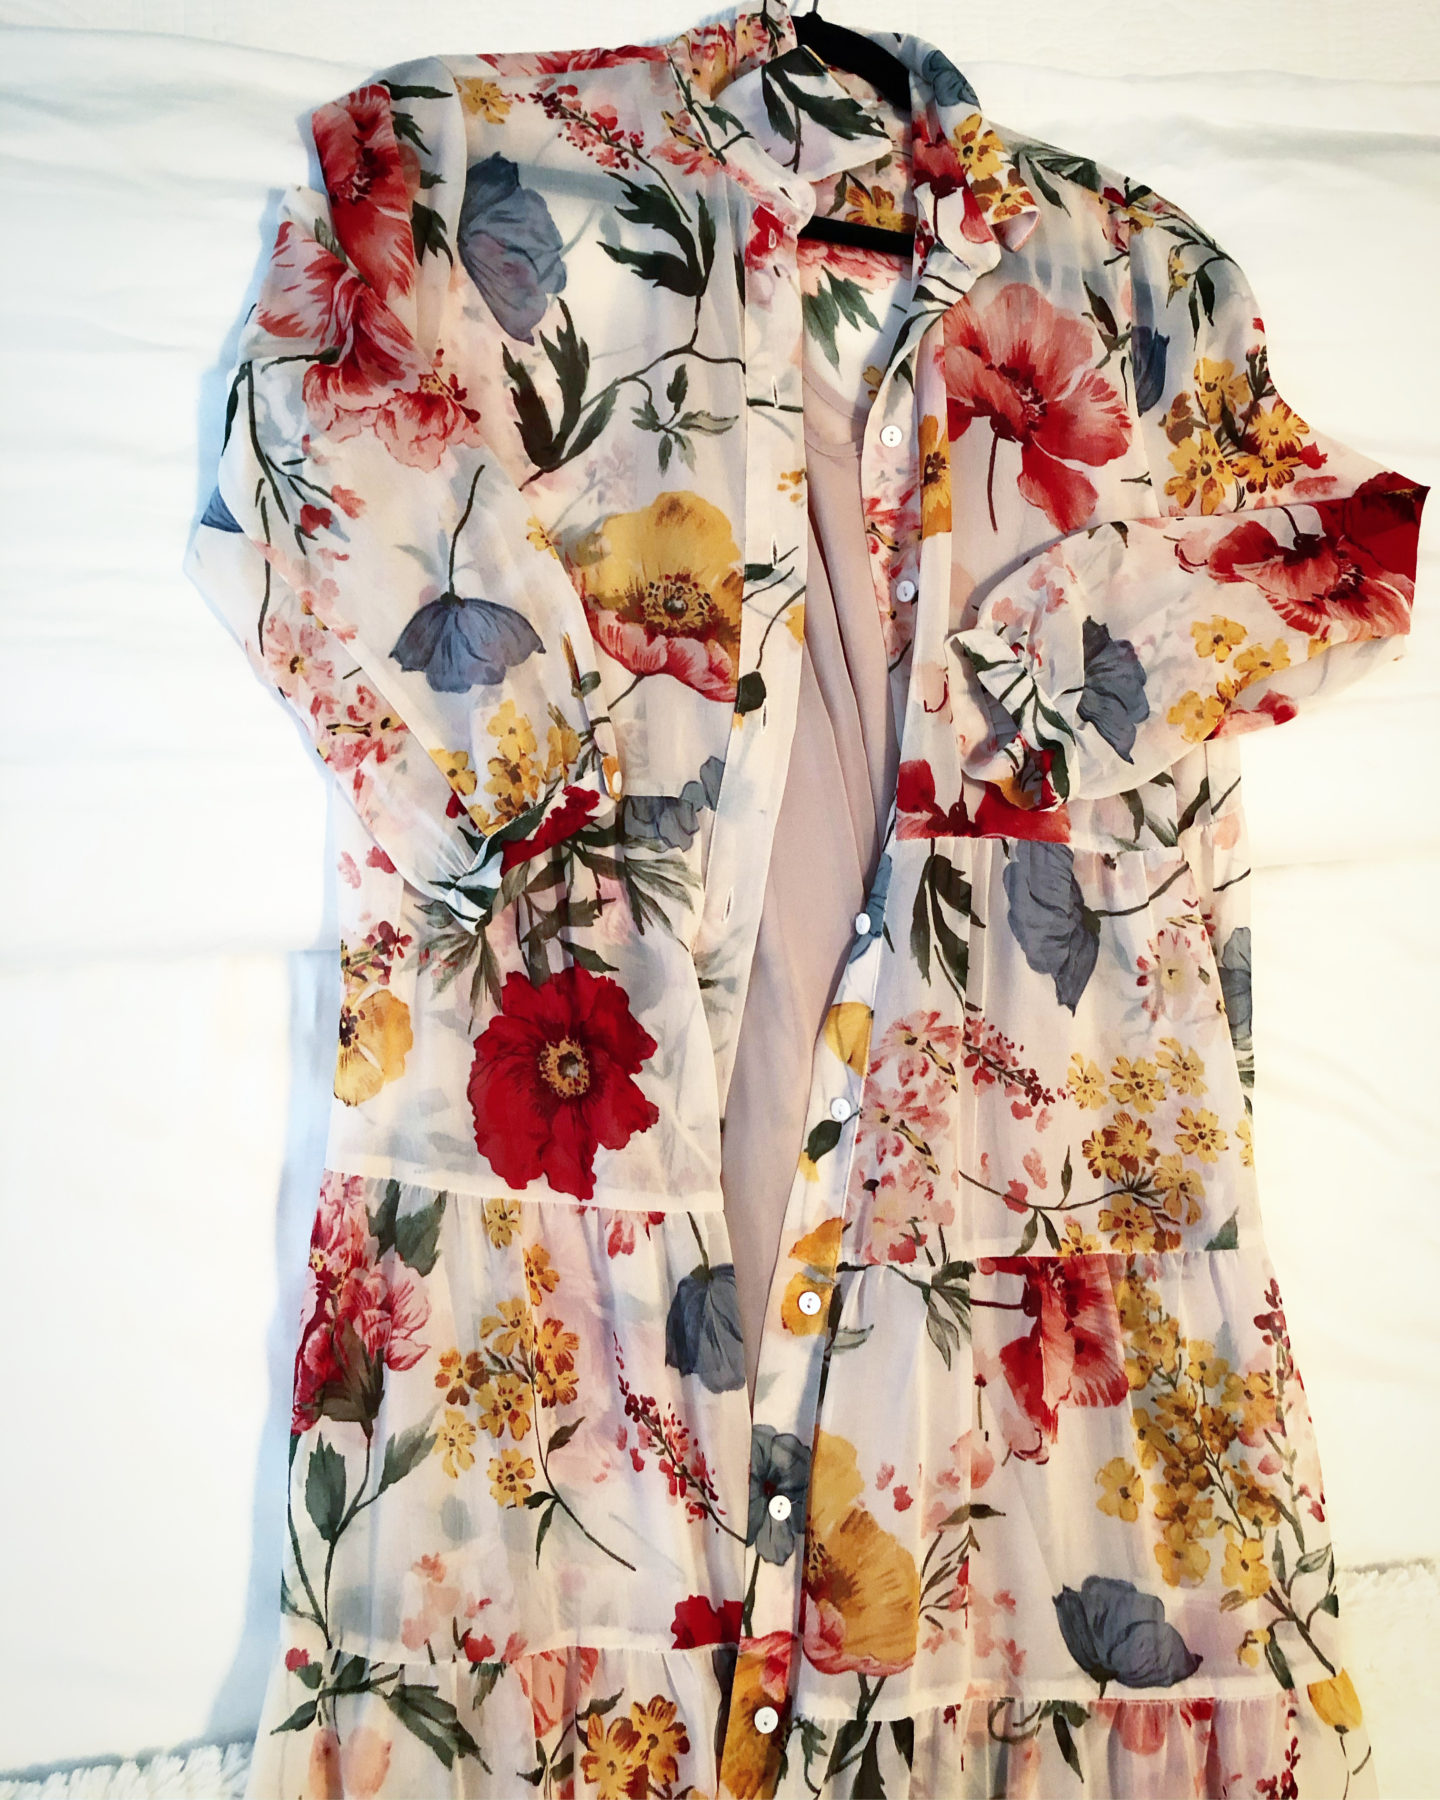
Let me know if you enjoyed this Halloween look. We have about a year until Halloween shows up again, however, I hope these steps help you to recreate this amazing look. Any dress will work for this costume, what is crucial is the face to make the entire look come to life.
There are many different ways to look like La Catrina or La Llorona. Every makeup look is different. Therefore, there is no right way of doing this. So, make it your own and have fun!